by Caroline | Nov 23, 2018 | Wellness, Yoga
Happy Holiday Season! Even though Thanksgiving just happened and it still feels a lot like fall (we still have some beautiful foliage here right now in North Carolina) I am all into the holiday spirit right now.
I am also a firm believer in protecting your energy when it comes to the malls and hectic shopping situation during the holidays. It can leave you feeling angry, depleted, and completely out of the holiday spirit. You can either find me at the mom and pop shops in my hometown supporting local businesses, or ordering gifts online, in my pj’s with a cup of tea.
Let’s simplify the task of your holiday shopping, so you can retain some joy and remember what this time of year is really about. The gifts I have included in this guide are all affordable, and curated for you!
As I’ve started to grow my blog, I’ve had the opportunity to partner with some great small businesses and I’m so happy to share these companies in this year’s guides. I have noted in the descriptions below which ones are from small businesses, if you’re tying to support the little guis this year. Additionally, I’ve also shared Amazon links here as well, so make your shopping much easier. I’m a big fan of Amazon just for the convenience. I want to note that some of these links are affiliate links which means I may earn a small (like jokingly small) commission if you purchase through my link. Just gotta throw that out there to be all legal and stuff.
So for all the wellness enthusiasts out there…you know who you are… drinking green juices, going to soul cycle, sage-ing the F out of your house after you have a fight with your boyfriend, and reading the latest personal development book, I’ve got you! Check out my pics for 2018!
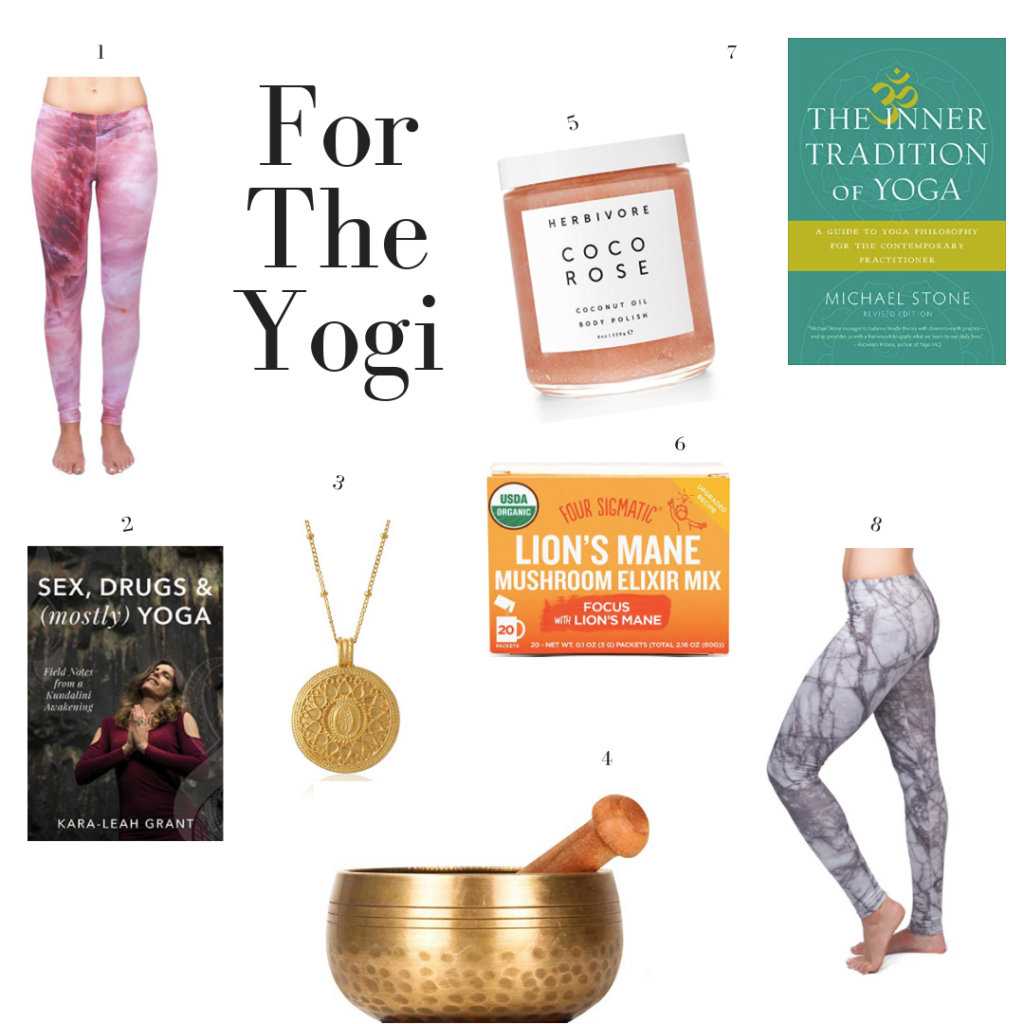
1. Confused Girl In The City- Grace Leggings. I love this brand! Not only was it started by a young female entrepreneur (I totally want to support all my ladies out there) but what makes them different is all the patterns are taken from images of actual crystals. The pattern on the Grace leggings are images taken directly from a ROSE ONYX Crystal. Onyx is associated with the root chakra. It assists with challenges in life, especially those caused by a drain of energy. It prevents the draining away of personal energy and can be used for protection from such. It also helps with grounding or eliminating unwanted energies. These pants are on sale at the moment AND you get to use my discount code bloomspark. *You’re supporting a small business by purchasing from this company*
2. Sex, Drugs, & (mostly) Yoga by Kara-Leah Grant. I haven’t read this but I’m super in to Kundalini right now and it looks awesome!.
3. Satya Jewelry. I am sooooooo jazzed that Satya jewelry is now on AMAZON! I first learned about Satya through my teacher Gabby Bernstein who is friends with Satya the jewelry designer. She was selling mala beads at the Spirit Junkie Masterclass I attended and her stuff is beyond gorgeous! Any piece from her is a winner. For those who know me well, i wear my gold Satya Spirit Junkie necklace pretty much every day! *You’re supporting a small business by purchasing from this company*
4. The Singing Bowl is my jam right now. I’ve recently partnered with a small business out of Canada called Shanti Bowls that sources high quality yet affordable singing bowls. I use my singing bowl for helping to unwind from a stressful day and clear my mind from work thoughts and daily stress. *You’re supporting a small business by purchasing from this company*
5. Herbivore Coco Rose Body Polish, this stuff feels amazing after a sweaty vinyasa class, or really anytime you need to feel clean and sparkly. Also, the Herbivore brand is on Amazon now and all their products have an emphasis on organic, high quality, and food-grade ingredients.
6. Four Sigmatic Lion’s Mane. If you haven’t gotten on the mushroom bandwagon what are you waiting for? The health benefits of mushrooms are innumerable! All of Four Sigmatic’s products are derived from high quality mushrooms are are incredible for your health and vitality. But sorry, they won’t get you high!
7. The Inner Tradition of Yoga by Michael Stone. I’m interested in reading this book because so much of yoga in our culture is so focused on outward things like your outfits and what fancy poses can you post to instagram. This will help you get back to the real meaning of yoga, which is truly an inward journey.
8. Confused Girl In The City Mystery Leggings. I know, I have them on here twice, I just find the patterns so pretty I couldn’t choose just one! The pattern on the Mystery leggings are images taken from a beautiful MARBLE Stone. This stone is beneficial for the blood, skin, and cleansing systems. It is used to provide both clarity and states of suspension in meditation. Provides for strength of self control and mastery of thought. It enhances the powers of serenity. These are also on sale at the moment AND you get to use my discount code bloomspark. *You’re supporting a small business by purchasing from this company*

by Caroline | Nov 20, 2018 | Wellness, Yoga
Yoga is great for improving your sleep because gets you in touch with the breath, which is something we don’t really think about during the day. But I’m not talking about your average yoga class where you do a lot of moving.
Tonight I’m going to show you some poses that you will hold for a longer amount of time. Yep, you heard that right, no flowing from one pose to another. Basically you’re just gonna sit there for a while to allow your body to fully relax.
When you slow down the breath, and stay in a pose for a longer amount of time you can feel different areas of the body that are tense and holding on from your day and gradually let that go as you sit and breathe through the pose. And stretching in general has a calming effect. Restorative yoga is great for calming the mind and body after a long day and helping you prepare for sleep
Here are some of my favorite yoga poses to do to help me fall asleep, and you can do all of them from the comfort of your own bed.
Ideally you want to do each pose for one to five minutes, holding each position gently without strain or pain for as long as feels comfortable to you. Can’t manage the full sequence? Pick your favorites and build them into your routine as you can.
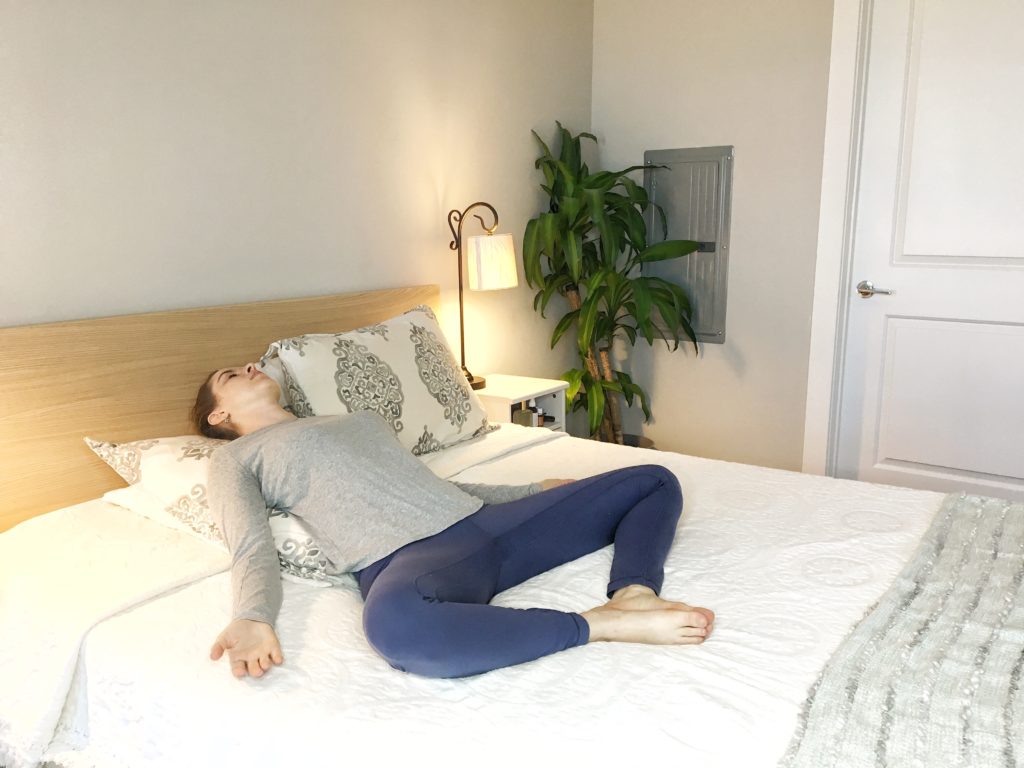
- Stack two pillows on top of each other this will (mimic the support of a bolster typically found in a yoga class)
- Position yourself sitting with the end of the pillows touching your tailbone.
- Bring the souls of your feet together, letting your knees splay out to the sides If that is not comfortable you can place two pillows under each knee for a little more support.
- Slowly lower yourself down on the pillows making sure that your head is supported your neck is comfortable.
- Close your eyes and place your hands anywhere you feel comfortable, either on your lower abdomen, tops of thighs, or arms out at your sides palms facing up.
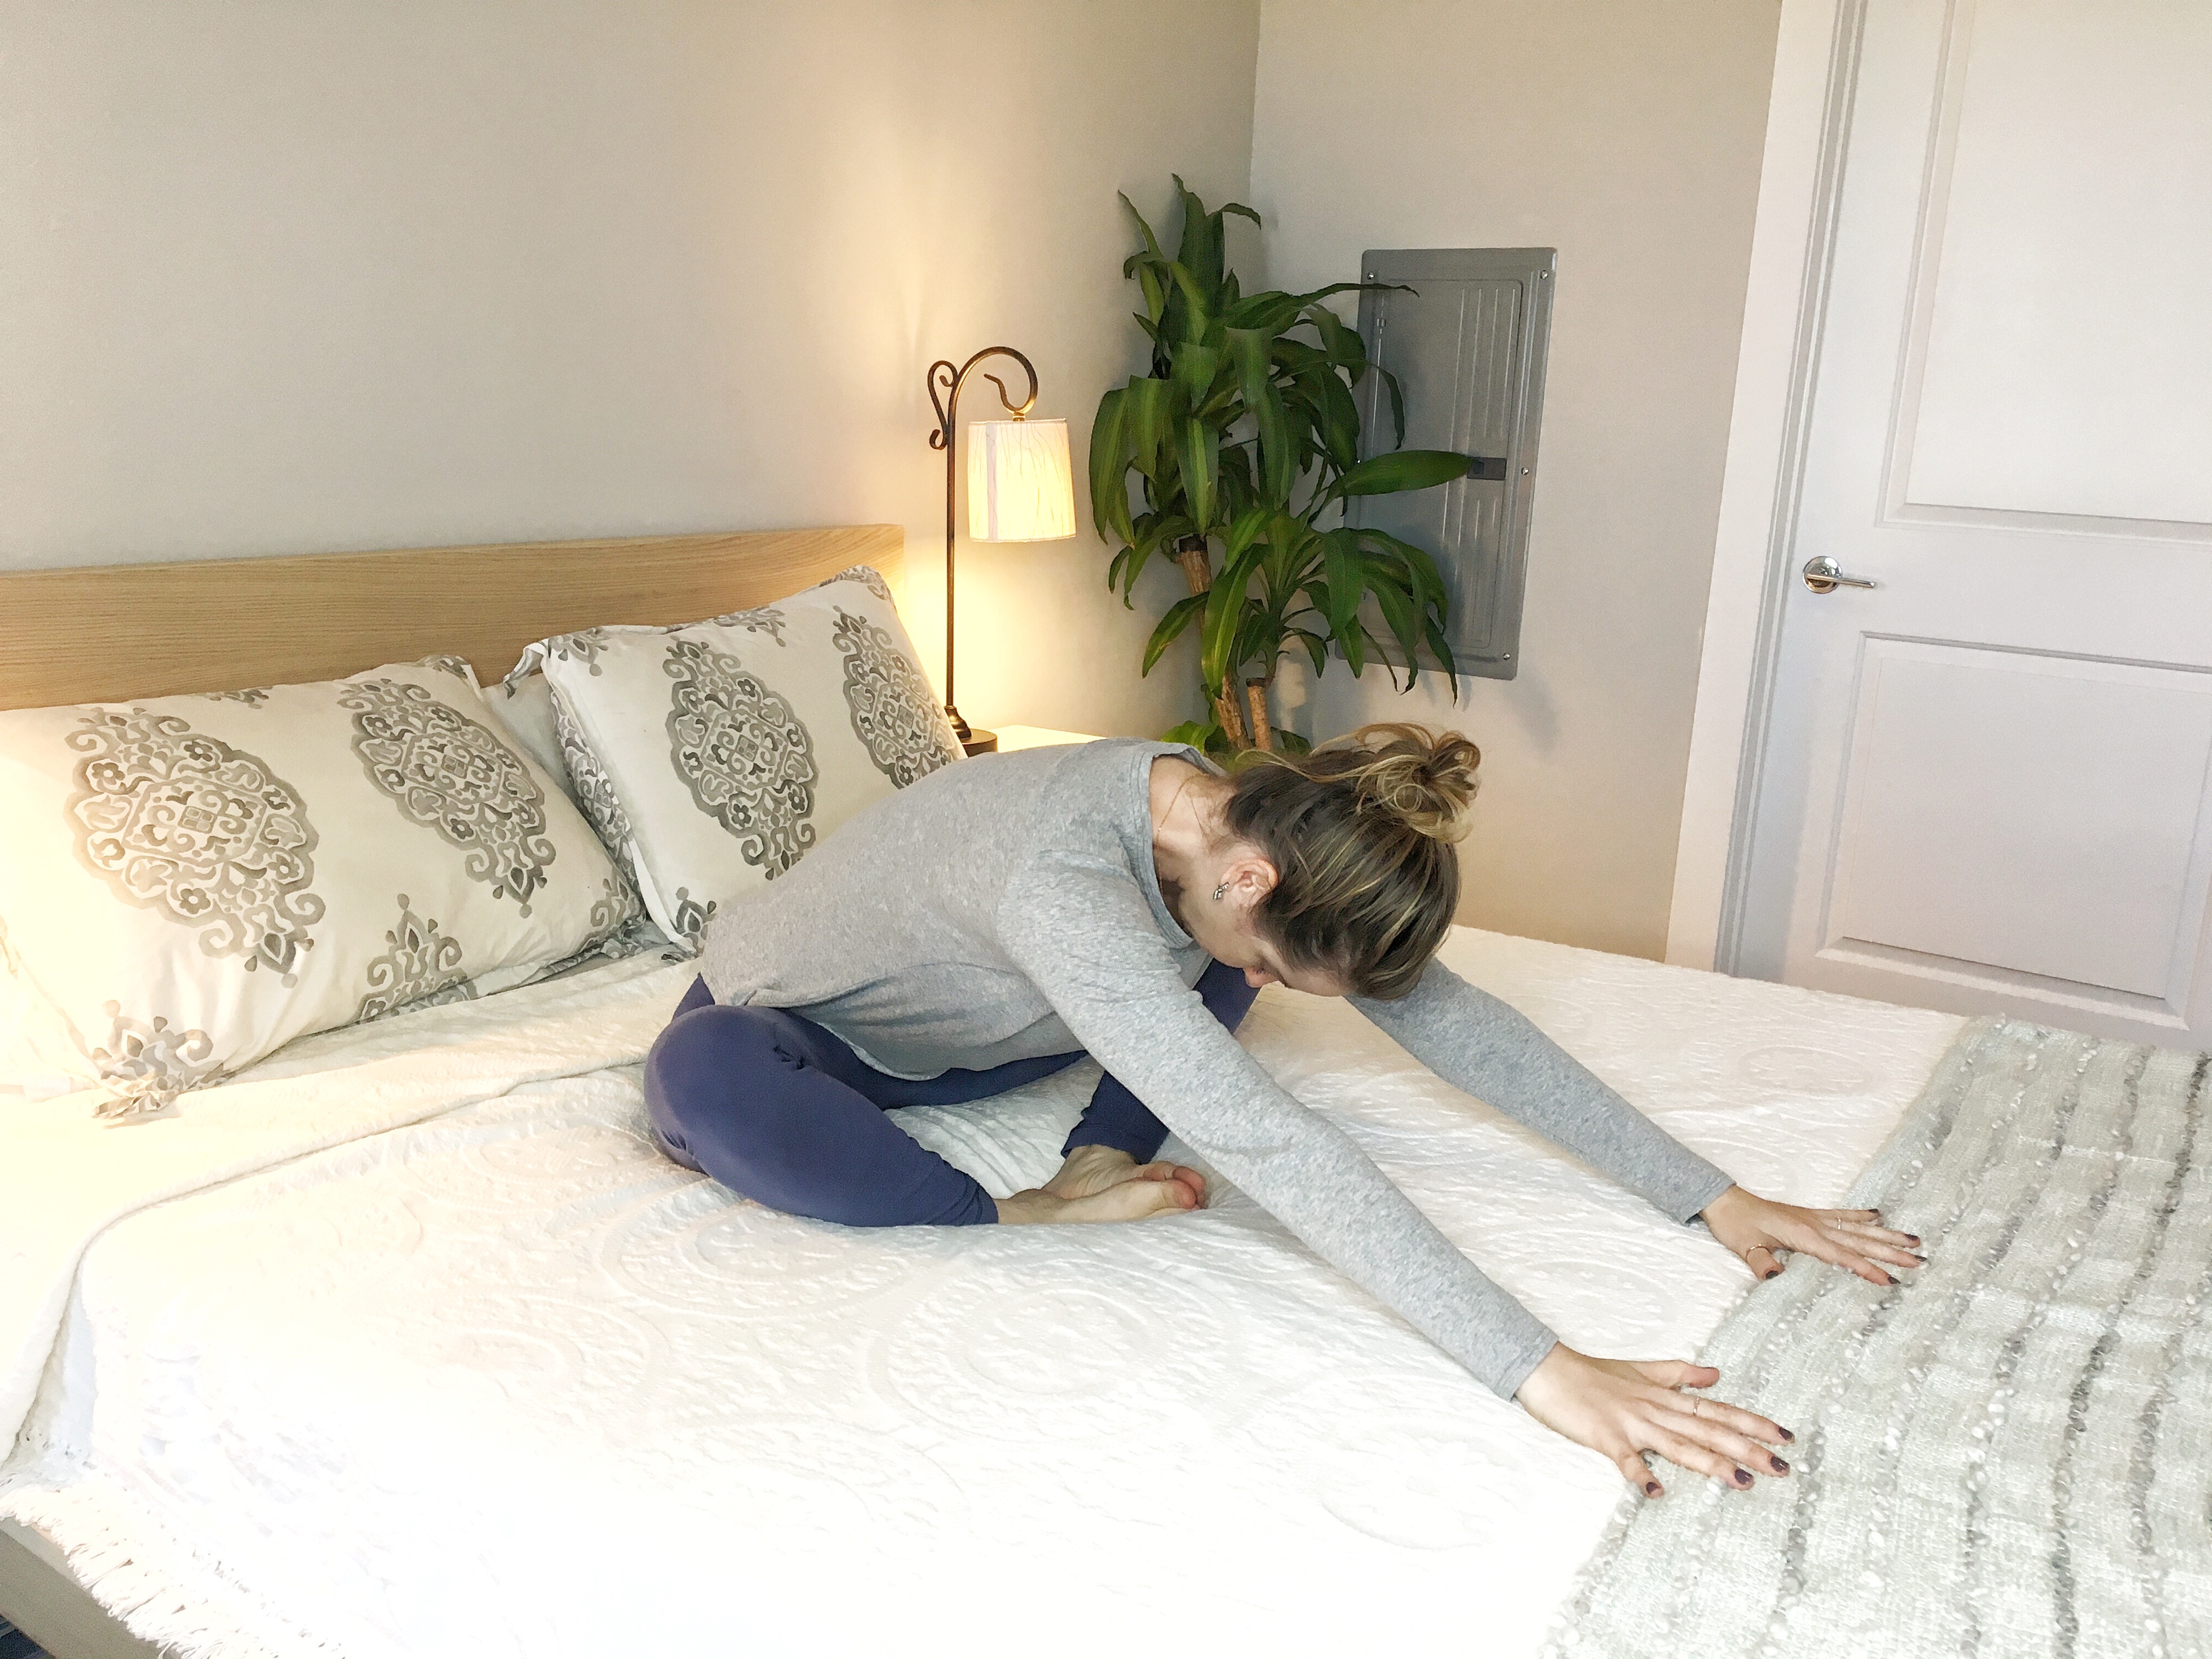
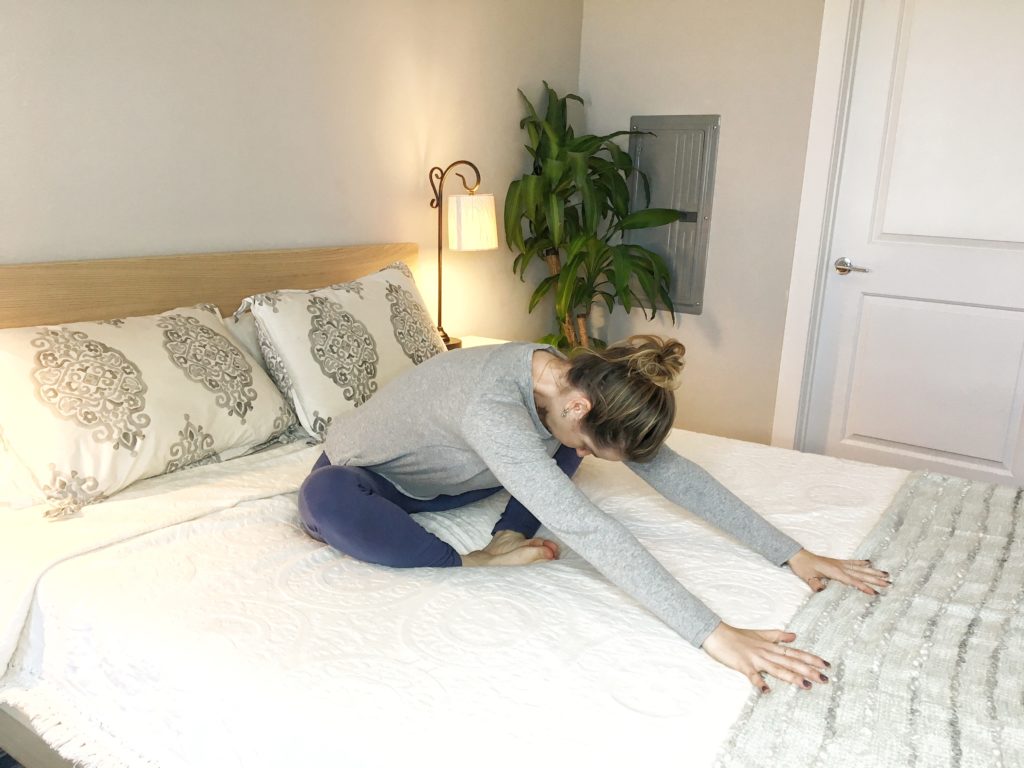
Bound Angle Forward Bend
- Come to a comfortable seat with the soles of your feet touching, letting your knees splay out to the sides. This is the same set up for reclining bound angle pose but without the pillows
- Reaching your arms out in front of you slowly bend forward to whatever level is comfortable to you.
- You may want to keep your arms straight, or if your hips are flexible bend your elbows and place your forearms on the bed.
- Slowly let your head release feeling the stretch in the back of your neck and upper back. If your back is tight you may not want to bend too deeply, but this is where you listen to your body and do what feels best.
- Once you have found a comfortable posture hold for 1-3 minutes, allowing yourself to release more and more tension in the neck as your body becomes more and more relaxed.
*Good to know!* Forward bend postures in general are great for bed time because they promote turning inward, away from the world, and into yourself, a great practice when letting go of the day.
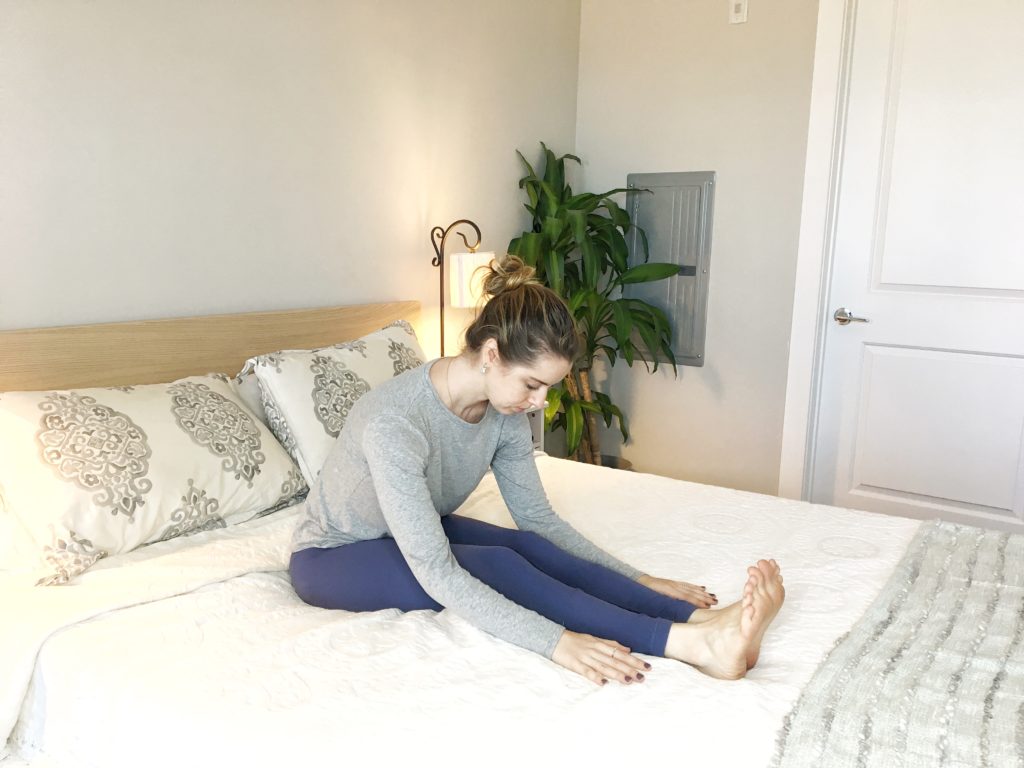
Seated Forward Bend
- Begin in a seated position with your legs extended out in front of you.
- Stretch your arms up to elongate your spine and slowly bend forward hinging from the hips.
- Make sure you try to keep your back flat instead of rounding your spine and bending from your mid back.
- If this is too much for a stretch you can slightly bend your knees.
- With each inhale, slightly lift and lengthen the torso, and with each exhale, release and fold a little more.
- Hold this for 1-3 minutes
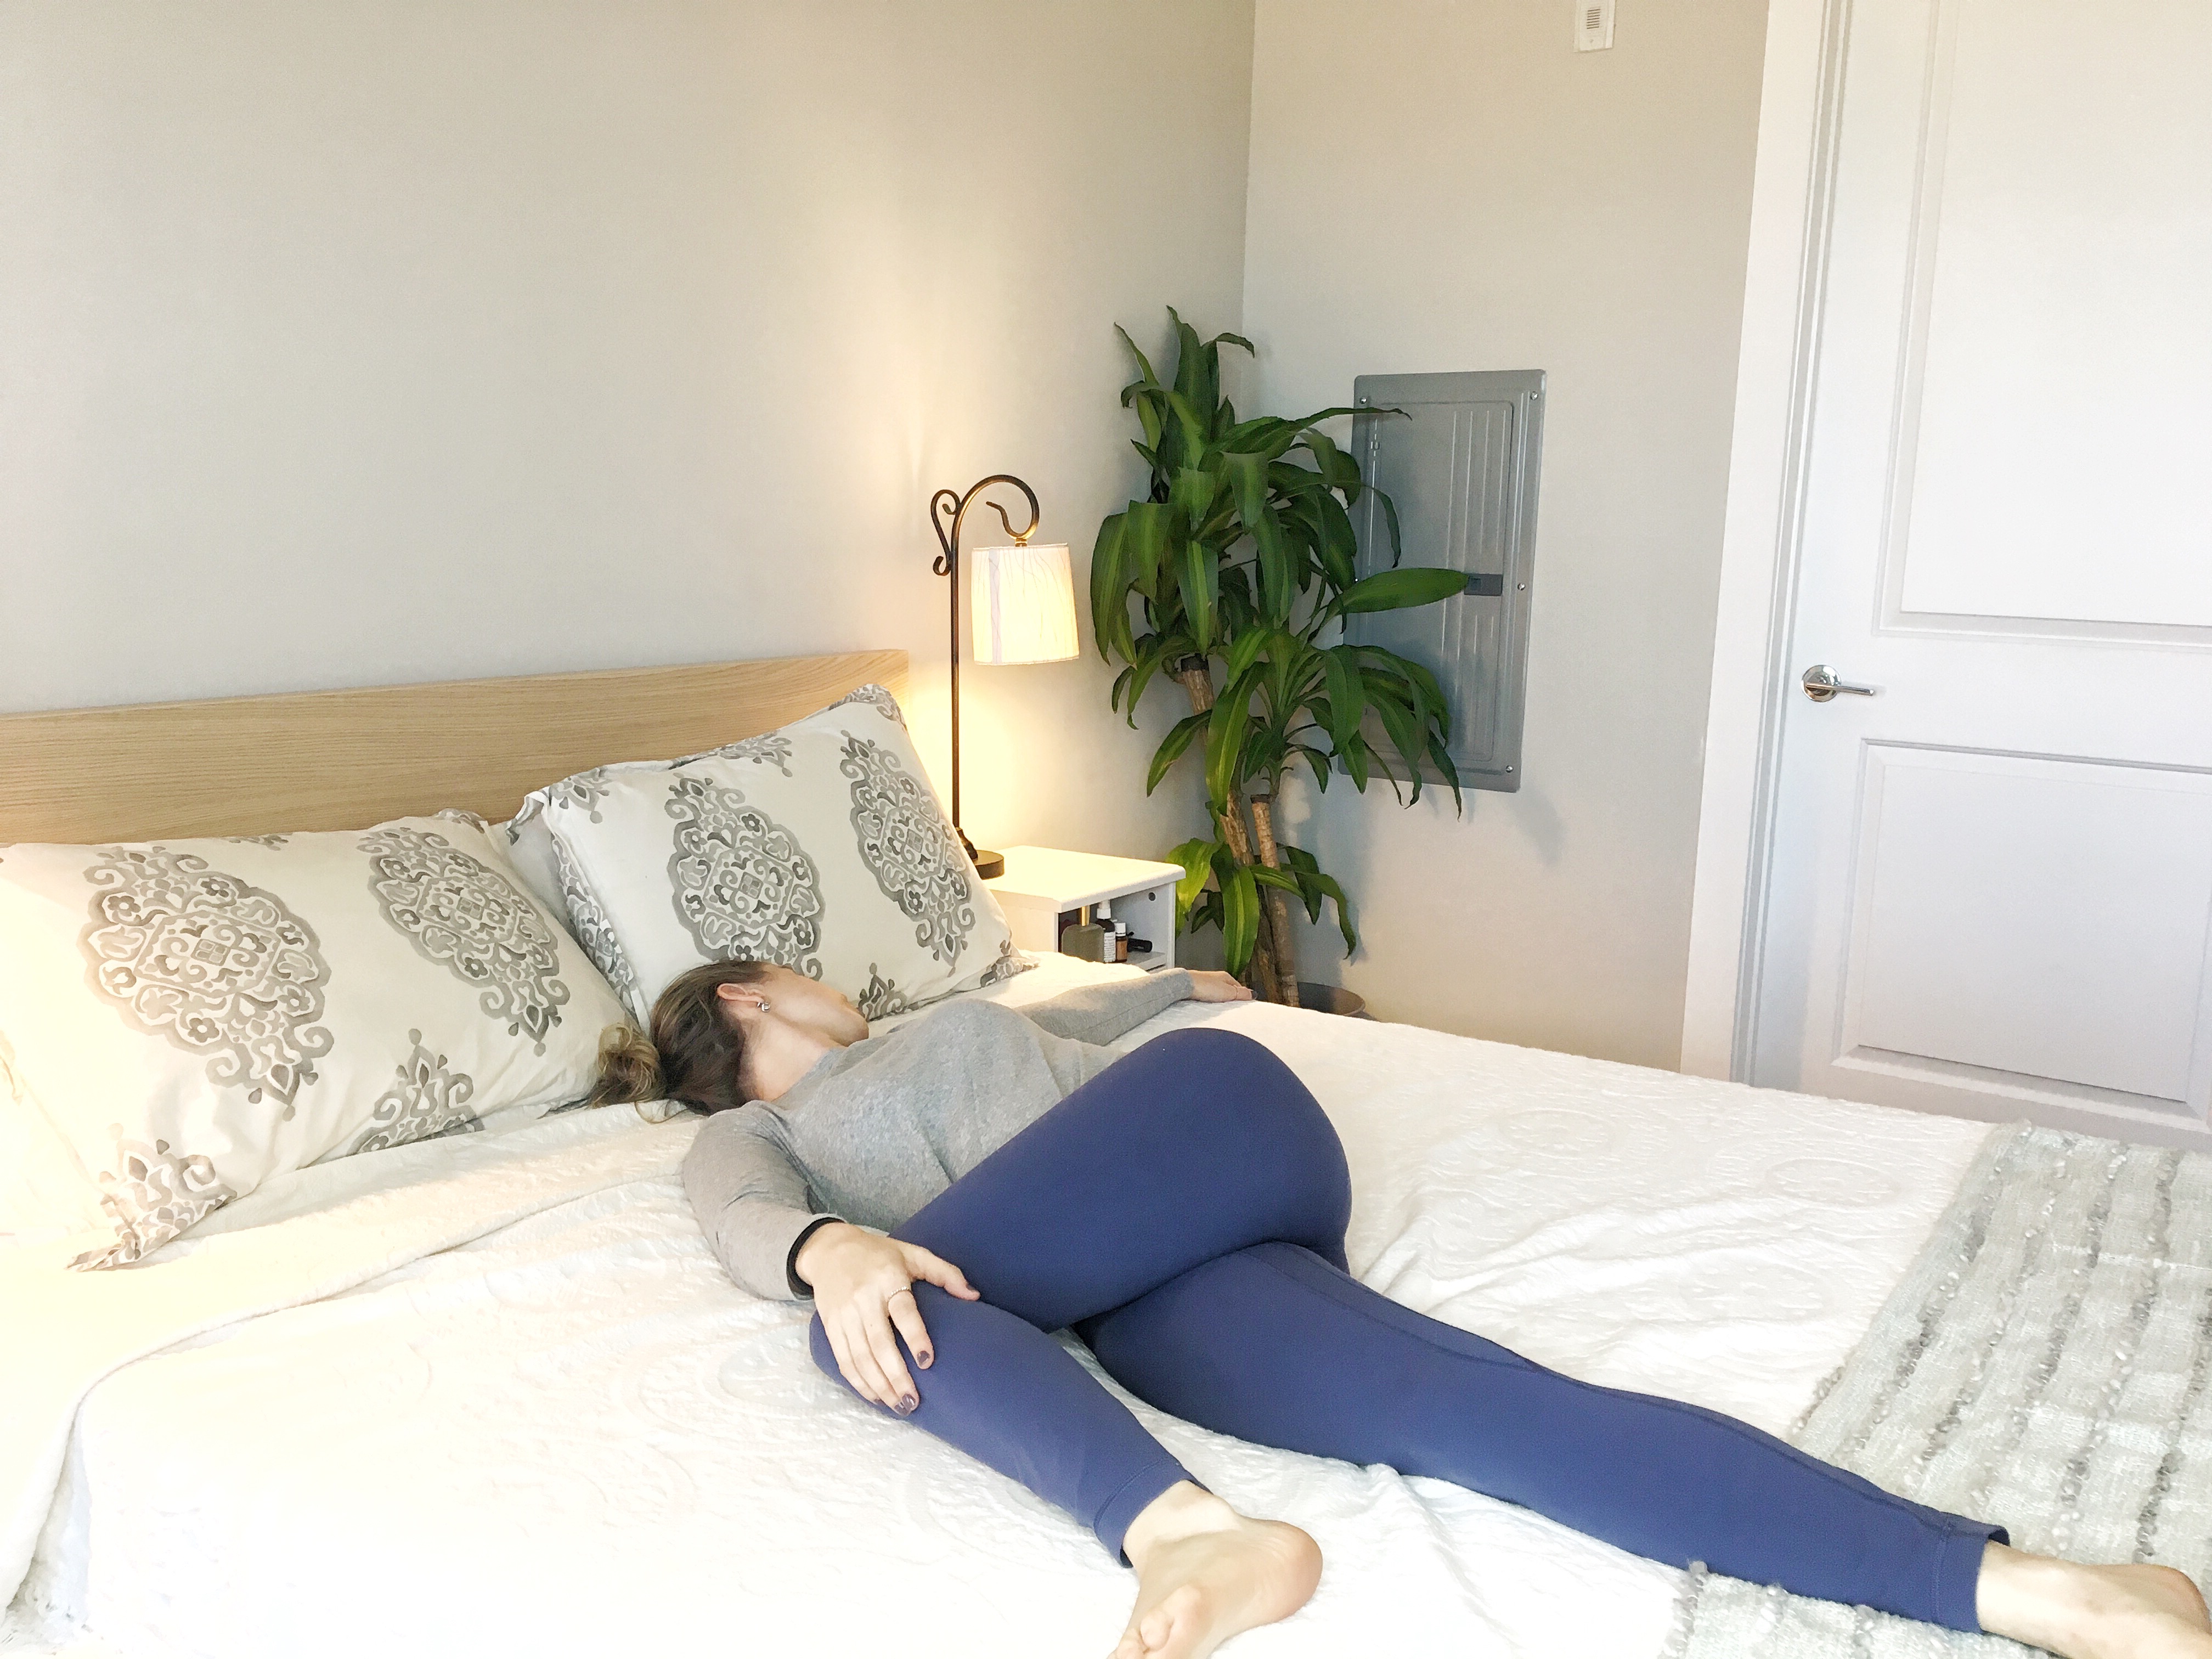
Reclined Twist
- Lay flat on your back and hug your right knee into your chest
- Slowly bring it across your body to rest on your left side using your left hand to guide it and letting your right hip lift up so your hips face the left side if the room.
- You can keep the left leg straight or bend it along with the right leg as well.
- Keeping your shoulders flat on the bed, turn your head to look over your outstretched right arm.
- You will feel a gently twisting of your spine and torso as your hips face left and your head points right.
- Hold this pose for 1-2 minutes, or however long feels good for you, and repeat on the other side.

Legs up the wall
- The easiest way to get your butt as close to the wall (or your headboard) as possible is to start by sitting with one of your hips touching the wall, then slowly bringing your legs up the wall, almost like the hands of the clock. (watch the video if this seems confusing)
- Laying flat on your bed or the floor extend your legs straight up the wall, taking a slight bend in the knee if that’s comfortable.
- If your hamstrings are too tight you can try this pose with a pillow or bolster underneath your hips to give them some lift.
- If you have props at home you can use a strap around the thighs for extra support or place a sand bag on the soles of the feet for a wonderful grounding sensation.
- Hold this pose for up to 5 minutes or longer, going with what feels best for you.
*This is an all time favorite pose for relaxation after a busy day*

Watch the the whole sequence here!
Like this?
Share it on Pinterest!
by Caroline | Nov 3, 2018 | Recipes, Wellness
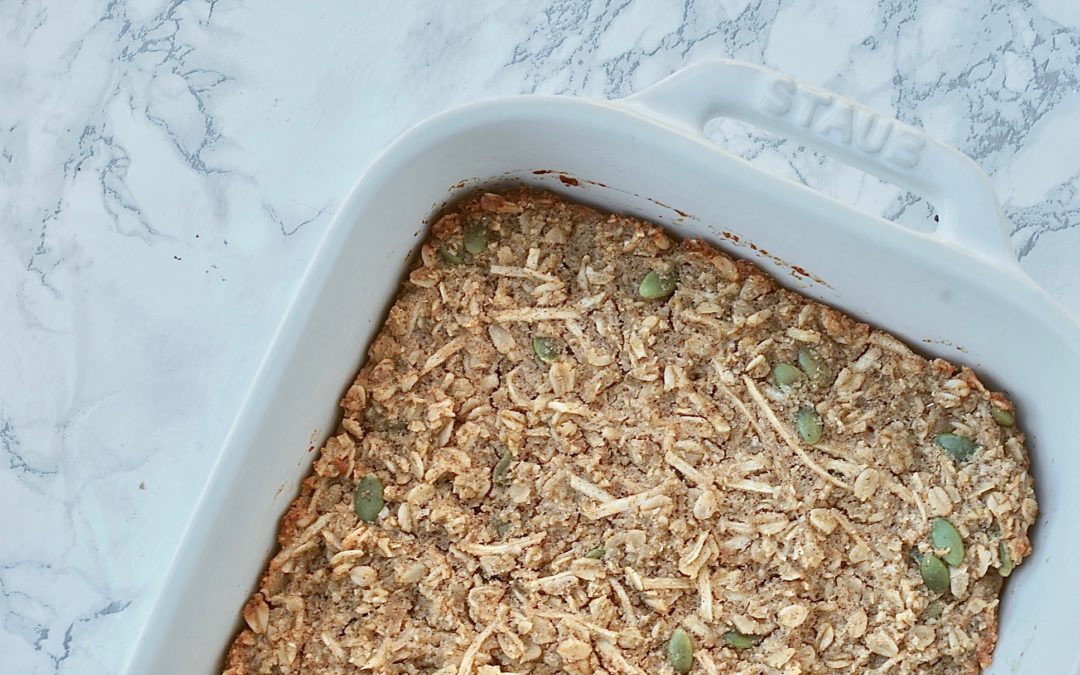
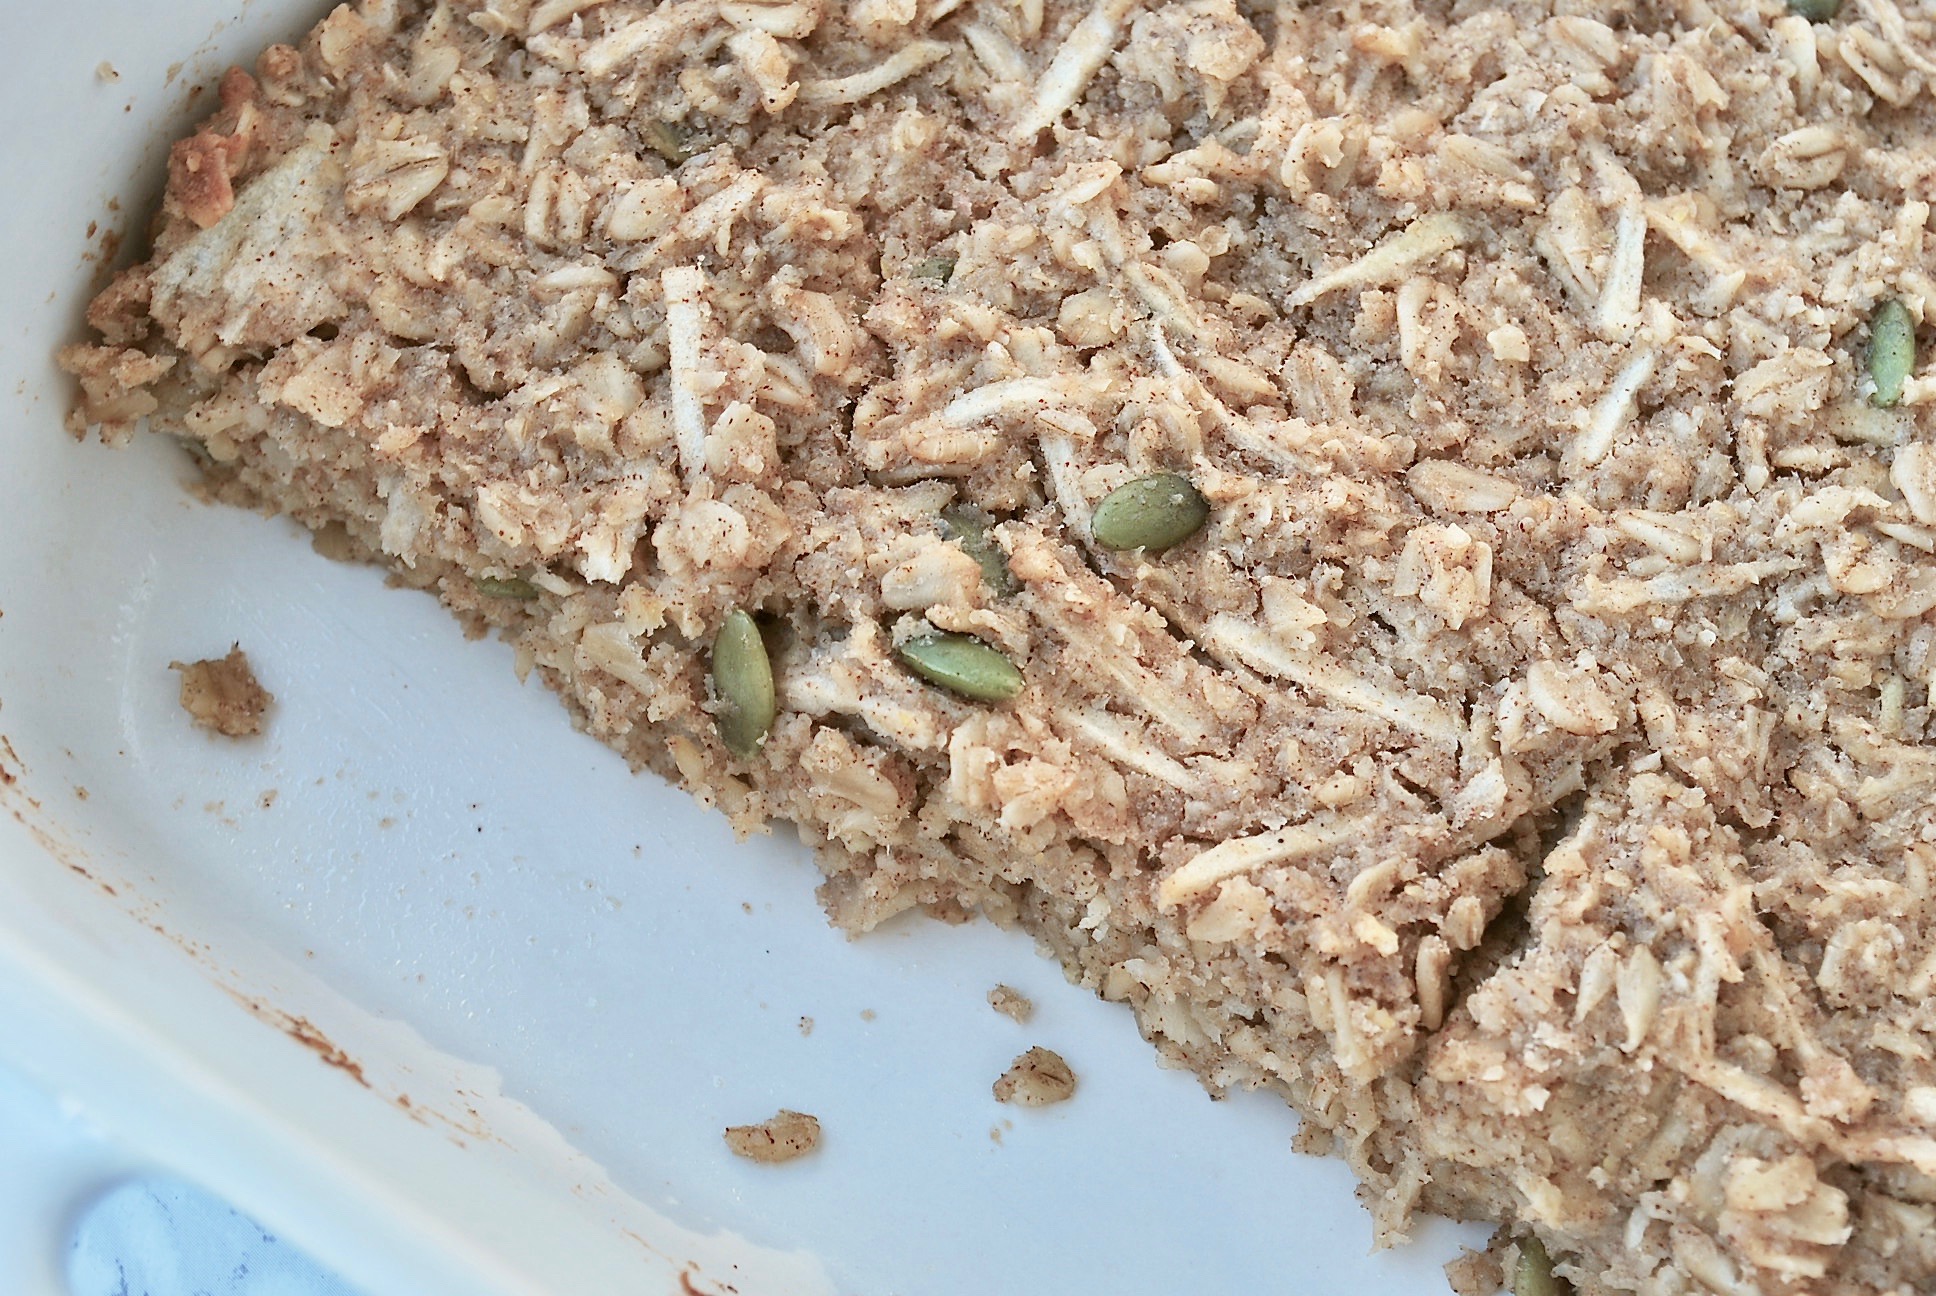
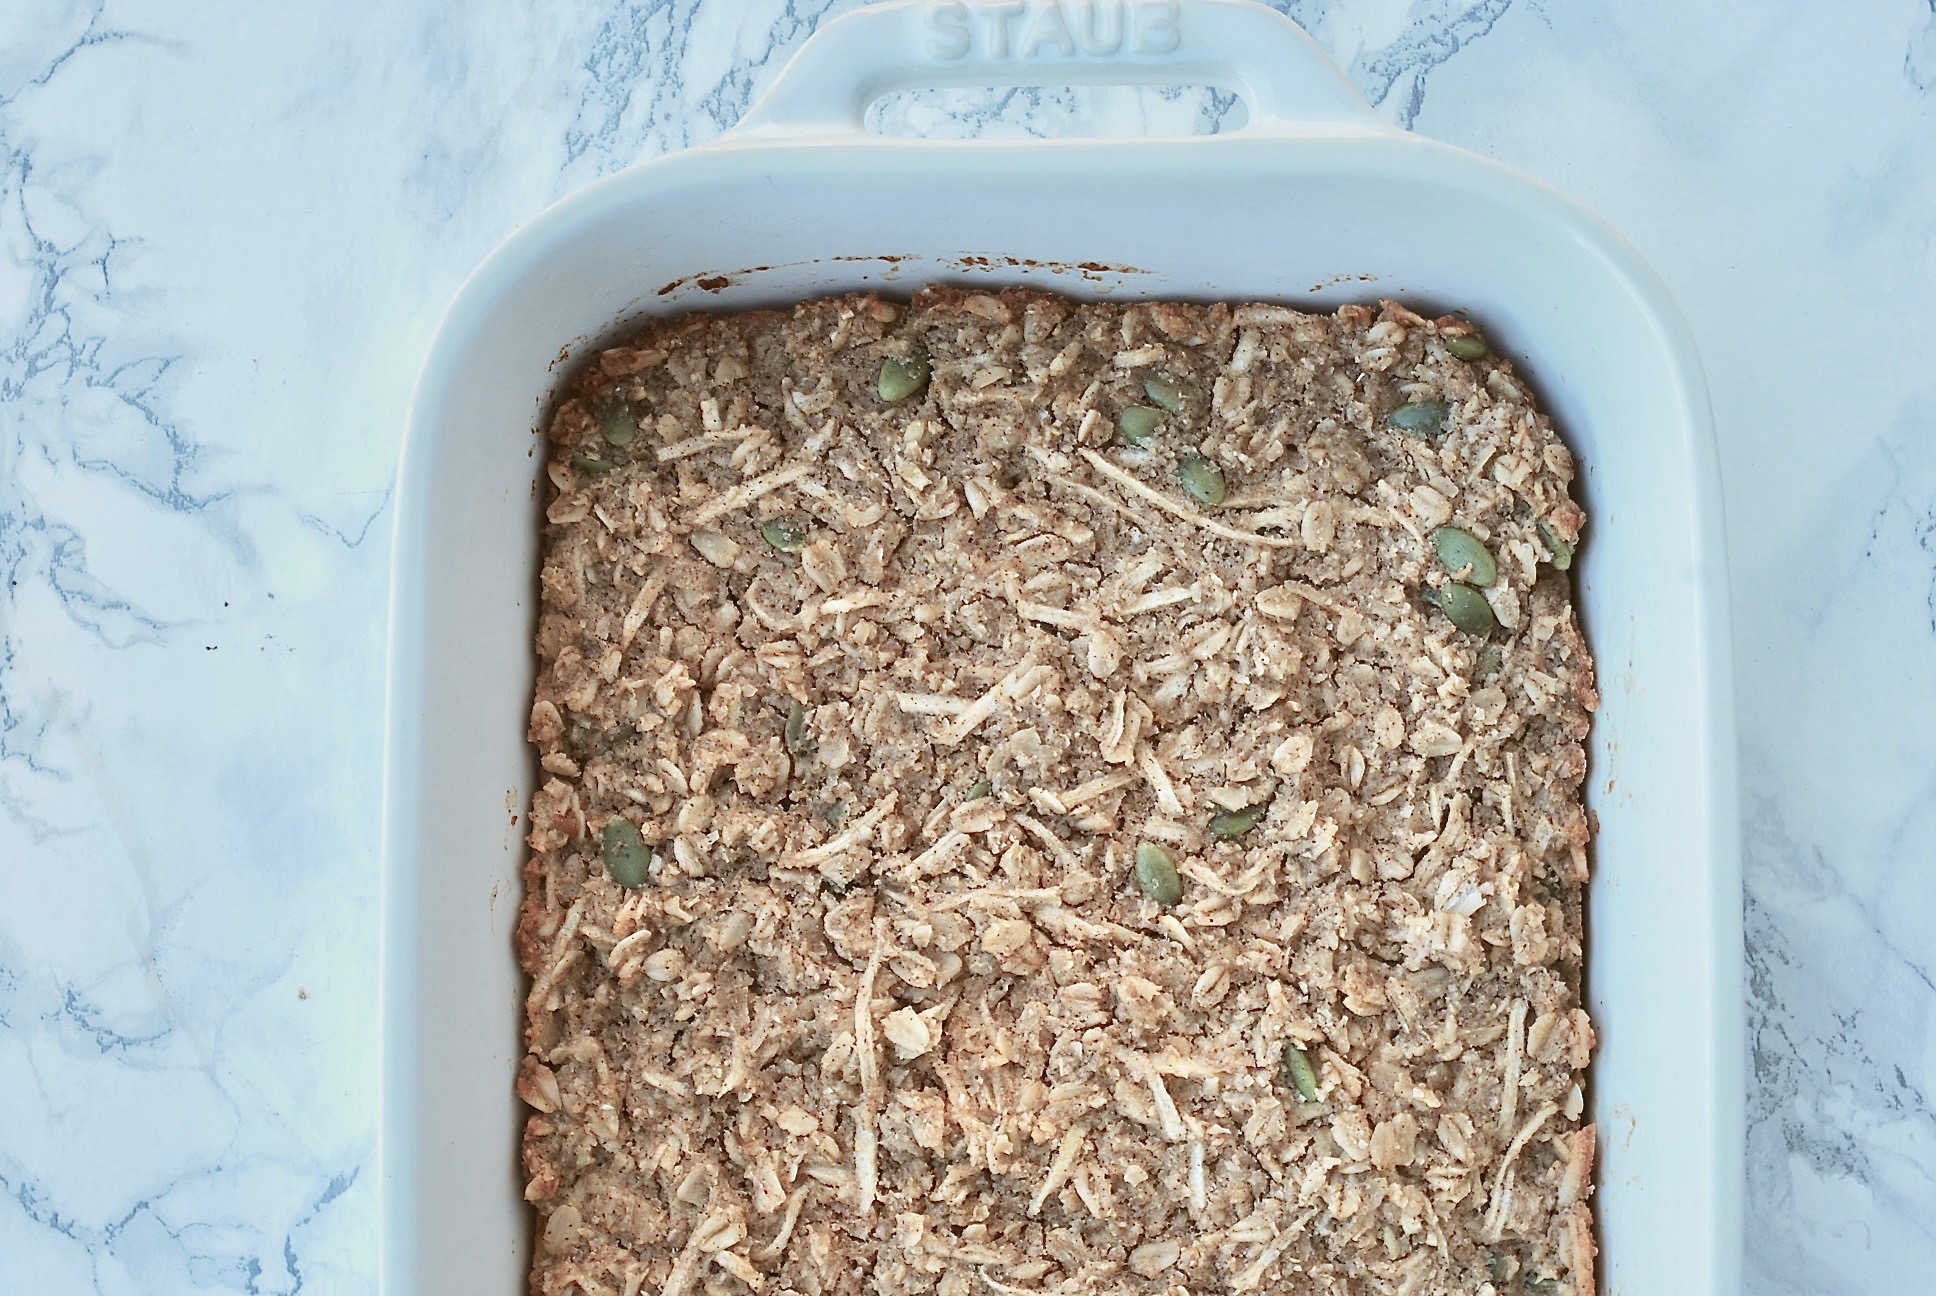
Having these apple pumpkin seed to-to bars on hand during the week made my life so much easier. Work has been picking up, and I’ve been leaving the house around 7:30 AM each morning. As the person who hits snooze till the last possible second, having something I could just grab out of the fridge and eat on my way to work was a life saver. Though I don’t recommend eating on the go, sometimes we have to, and when we do it’s best to be prepared.
Since it’s now Autumn, we want all the pumpkin and/or apple flavored everything right? These apple pumpkin seed to-go bars are my new favorite, and I will be making them every Sunday in preparation for the week ahead. They are healthy enough for breakfast, but they have just the right amount of sweetness to satisfy my after dinner sugar cravings without reaching for cookies or ice cream.
This is especially helpful for working women (like me) or busy moms who feel like they have to choose between heating healthy and having quick solutions on a hectic schedule. It’s my goal to make it easier!
And for all of you who don’t do grains, check out a my recipe Paleo Apple Cinnamon “Oatmeal” I did last year that feels like oatmeal, but it’s not!
Ingredients:
- 2 1/2 cups quick rolled oats
- 1 1/2 tsp cinnamon
- 1 apple (I like granny smith for baking) grated or shredded into thin strips- I used a mandolin slicer to shred the apple
- 1/2 tsp baking powder
- 1/4 tsp salt
- 1 cup milk or nut-milk of your choice
- 1 snack cup size of apple sauce (measures out to 1/4 cup and 2 tbsp if you’re not using apple sauce from snack cups)
- 1/4 cup maple syrup
- 1/4 c melted coconut oil
- 1/4 cup pumpkin seeds or nut of your choice (this measurement can totally be adjusted based on how much you want in the bars)
Directions:
- Preheat the oven to 350 and prepare a small to medium baking dish with some non stick spray. An 8×8 dish is a great standard size. Mine was more of a 10×7 but I don’t think it makes much of a difference. I follow the goldilocks rule…not too big and not too small. 😉
- Mix the dry oats, cinnamon, baking powder, and salt together in a medium bowl.
- In another bowl mix together the wet ingredients (milk, apple sauce, maple syrup, shredded apple, and coconut oil). *Here’s a tip, don’t let the wet mixture sit for too long or else the cold milk will harden the melted coconut oil. Learned that the hard way.*
- Slowly combine the wet ingredients into the dry ingredients and stir until it’s an even mixture.
- At this point add any nuts/seeds or other fun additions you might like. I used pumpkin seeds and they were delicious!
- Pour the mixture into the baking dish and pop that baby in the oven for 35-40 minutes.
Here are some ways you can change it up to meet your taste preferences or dietary needs…
- If you aren’t into maple syrup you can substitute any sweetener of your choice. I would stick with a liquid though or it might throw off the consistency, but HEY you might come up with an even better recipe in the process! Or try varying the amounts if you prefer to not have the bars too sweet, switch out the maple syrup for another serving of apple sauce. Just experiment!
- Maybe pumpkin seeds aren’t your thing, if so some great options are walnuts and pecans.
- You can even get really adventurous and put some dried cranberries in here too.
Enjoy!!!!
by Caroline | Oct 7, 2018 | Recipes, Wellness
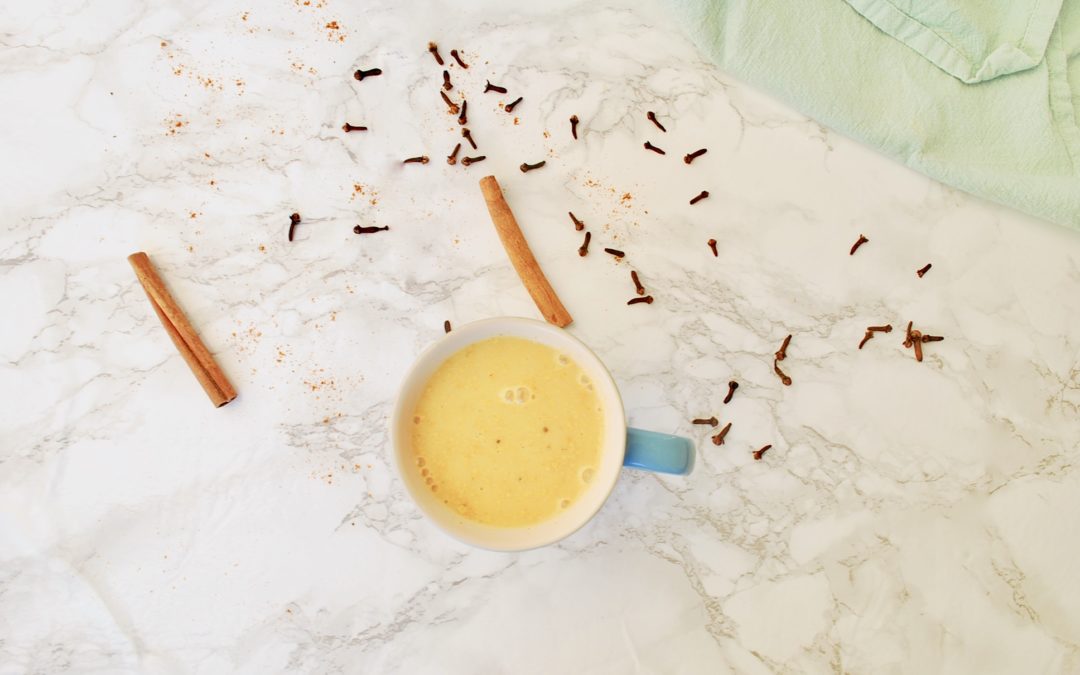
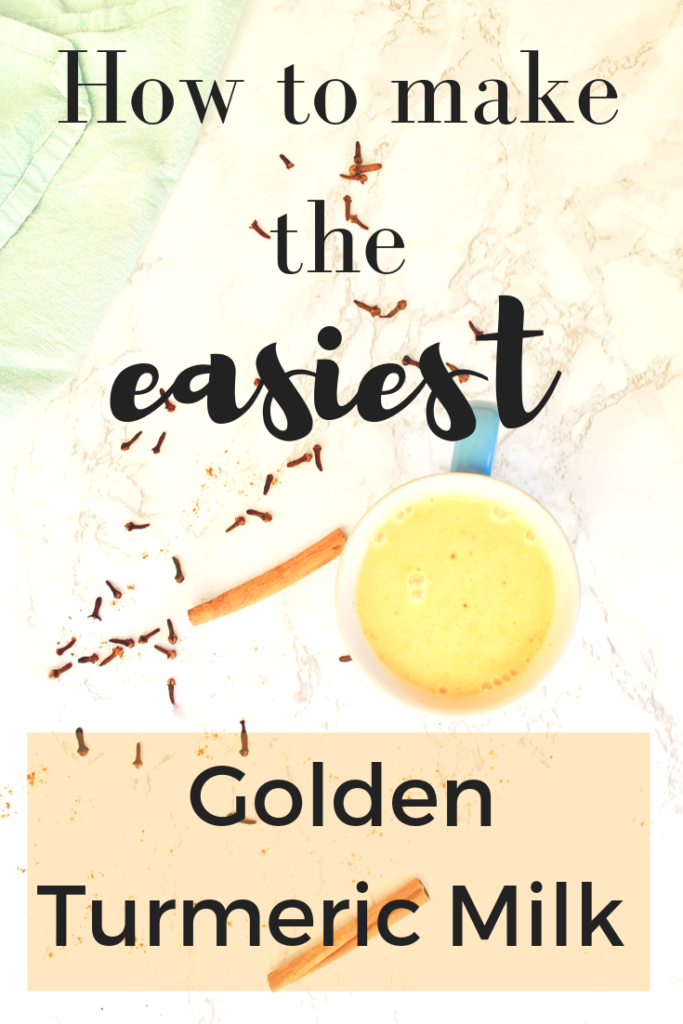
The Golden Turmeric Latte, or golden milk as it’s often called, has become a mainstay in the new wave of trendy wellness drinks. But turmeric actually has been around for centuries (like most things our society is re-discovering) and is used for it’s anti-inflammatory properties (oh yay, more new wave trendy wellness buzz words).
Why drink golden turmeric milk?
- Curcumin (the active component in turmeric) = antioxidant
- Cinnamon and ginger = also antioxidants
- These anti-inflammatory effects may reduce joint pain from osteoarthritis and rheumatoid arthritis.
- Curcumin may increase levels of brain-derived neurotrophic factor (BDNF) which is a compound that helps your brain form new connections and promotes the growth of brain cells.
- Curcumin has also been shown to have similar effects to antidepressants.
- Cinnamon, ginger, and turmeric have all been linked to a lower risk of heart disease and lower blood sugar levels.
- Curcumin has antibacterial, antiviral, and antifungal properties which may help prevent and fight infections.
- Turmeric may help reduce indigestion symptoms.
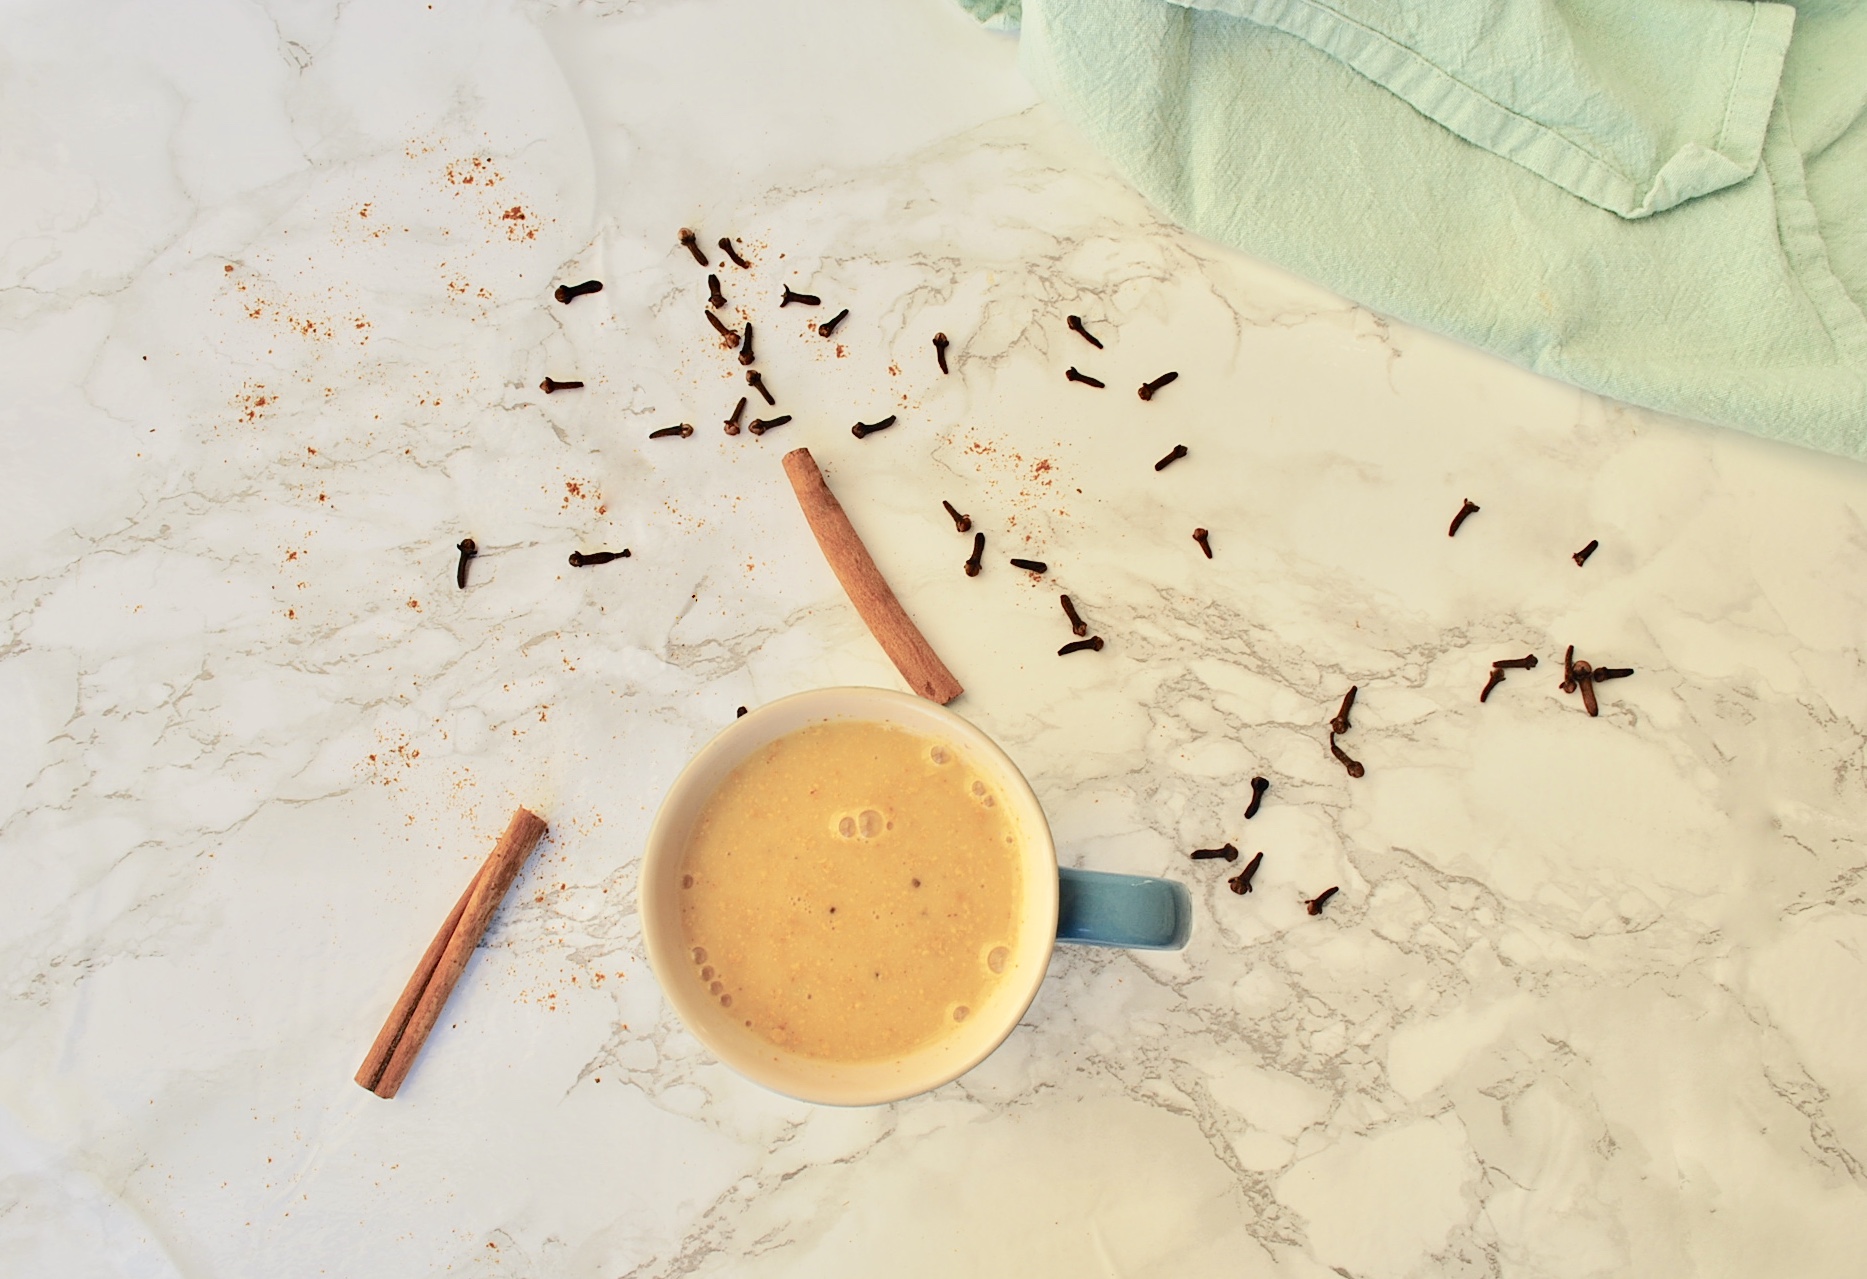
Golden Turmeric Milk recipe
* I want to note that if any ingredients or amounts don’t feel right for you, or just aren’t your thing, this recipe is really modifiable, and most of the time I don’t even use a recipe. This is a guideline, play around with different versions.
Ingredients:
- Turmeric
- Cinnamon
- Ginger
- Cardamom (optional)
- Nutmeg (optional)
- Clove (optional)
- Honey, vanilla extract (or any sweetener of your choice)
- Milk (cows, almond, coconut…any milk will do)
I added a variety of spices but don’t feel like you have to use them all. I generally use some variation of the above spices (always including turmeric, ’cause it wouldn’t be turmeric milk if I didn’t!). If you want to start out simple then turmeric, cinnamon, and ginger are the best way to go. If you want to add one of the optional spices, I suggest you add it at the end by just giving the spice jar a shake or two and go on taste.
The only measurements you need to know…
- 1 cup milk
- 1 tsp honey
- 1/2 teaspoon of turmeric
That is the most basic version of the recipe. Start there, then add in the cinnamon and ginger by giving it a few shakes at a time, letting your taste buds be your guide.
Directions:
- Heat 1 cup of your preferred milk in a small saucepan over medium/low heat (don’t bring to a boil).
- Stir in honey and spices and let warm up for about 5 minutes
- Stir occasionally so the spices incorporate.
- Taste as you go, and feel free to add some cinnamon and ginger. Don’t worry about not using measurements, a shake or two at a time will do the trick.
With all the recipes I share it’s my goal to give you not only recipes that are easily modifiable, but also recipes that don’t necessarily need strict measurements. I do this for two reasons:
- Anyone can follow a recipe, but what I love about cooking is developing the intuitive sense of putting together ingredients without a road map, and I want to inspire my readers to have the same intuitive approach.
- Strict recipes (aside from baking obvi) are somewhat off putting because if you’re missing one little ingredient it feels like you can’t make it, and I want you to feel like you can make this recipe what what you have at home right now.
The best ingredients are the ones you have in your kitchen at this very moment.
XO,
Caroline
Liked this? Pin it and share it with a girlfriend!
by Caroline | Sep 24, 2018 | Recipes, Wellness
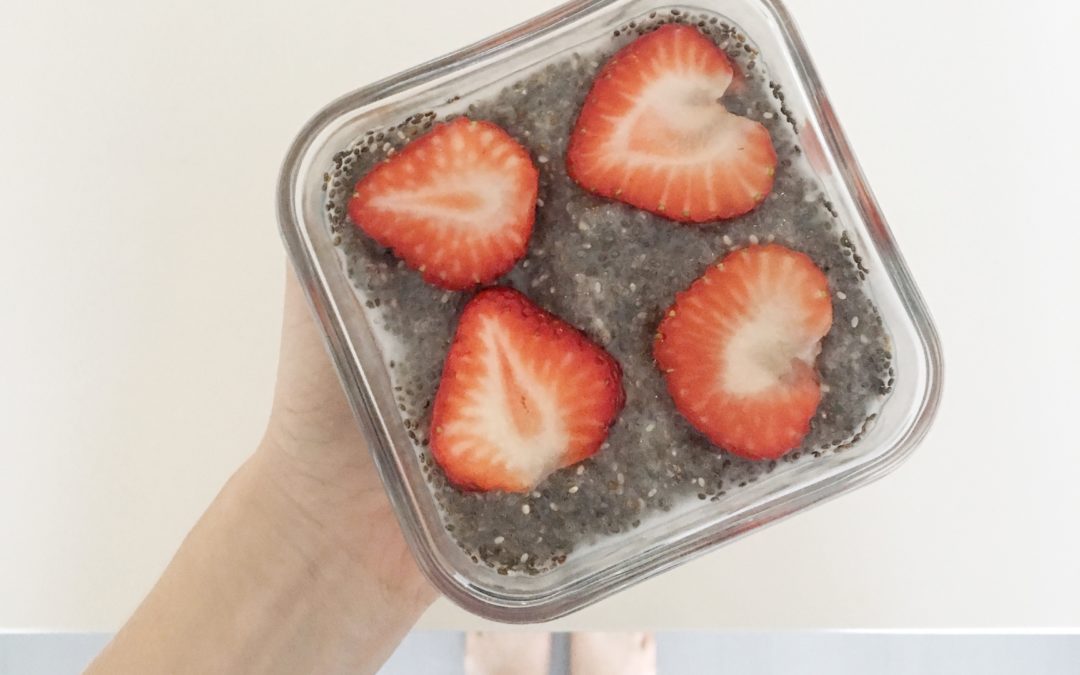
Chia seed pudding has become one of my favorite make ahead/grab-n-go healthy snack foods. It’s so simple, yet so healthy, and it’s actually really delicious too! All you really need to know are the basics, and then you can add whatever toppings or spices you like to make it how you like it. I’m going to show you two ways I like to make chia seed pudding.
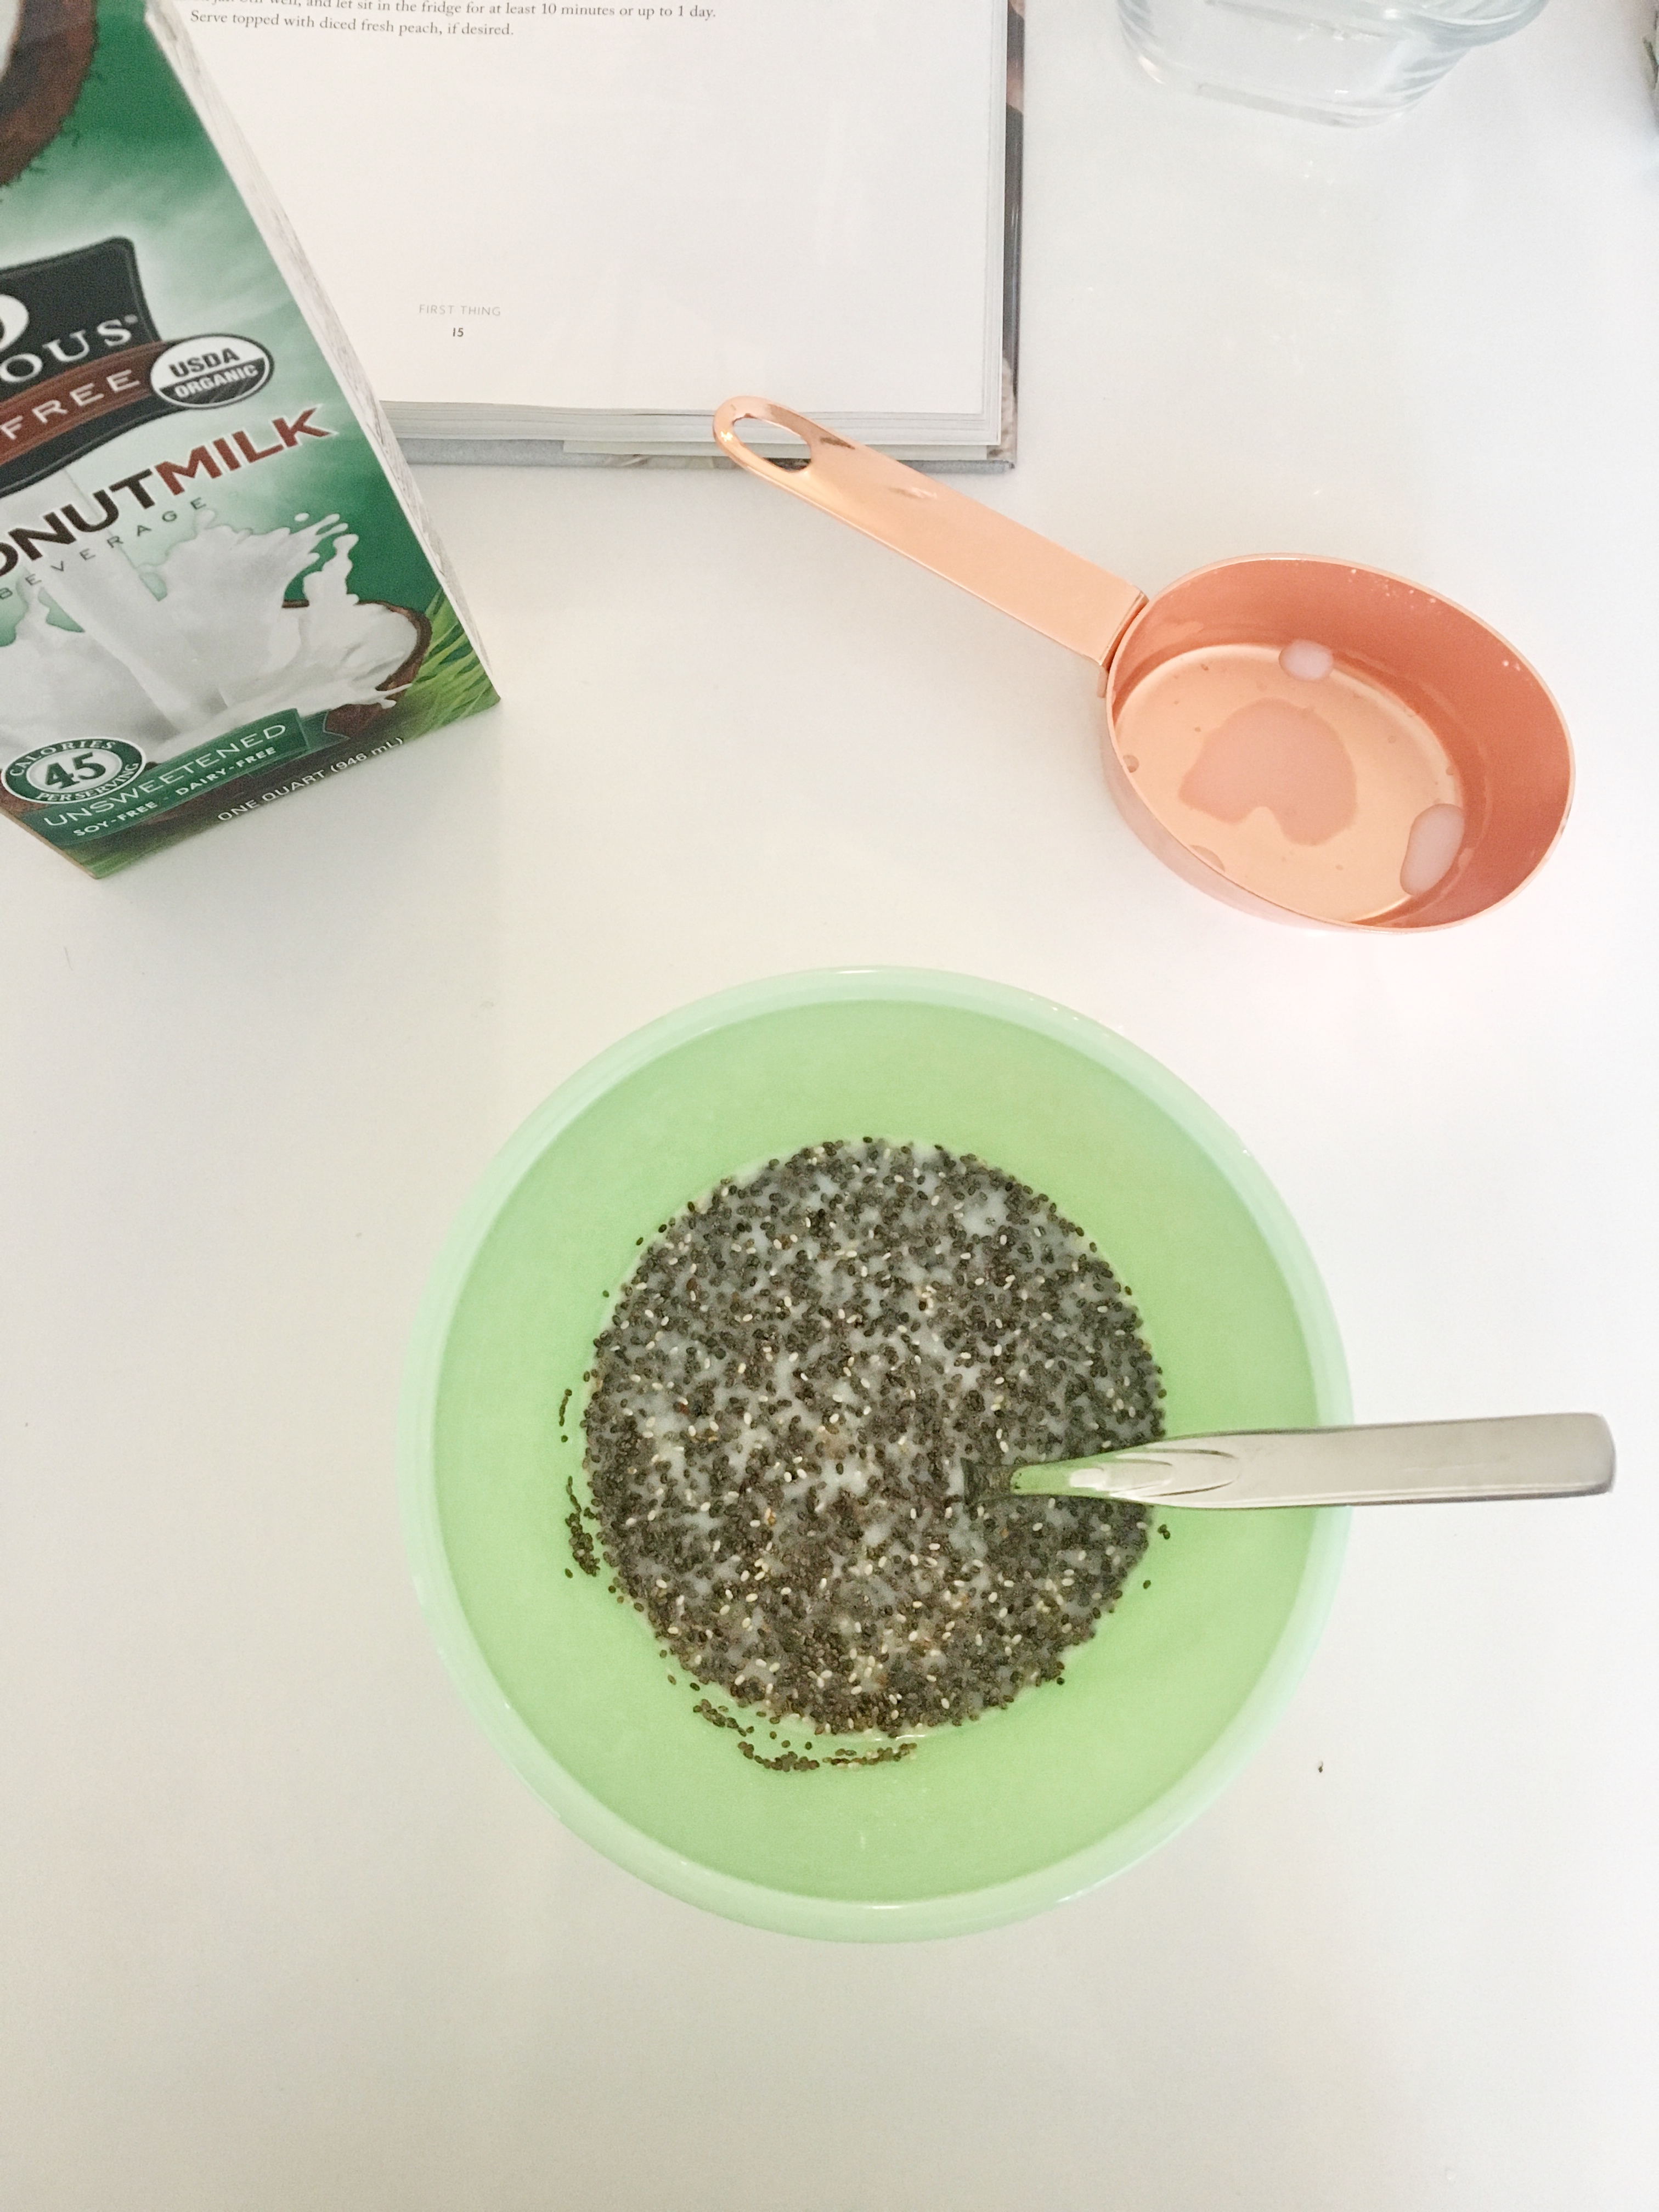
How to make Chia Seed Pudding
The base is just chia seeds and any kind of liquid of your choice. I prefer coconut milk but you can do water, coconut water, cows milk, or any kind of nut milk (checkout my recipe for homemade cashew milk if you really want to take your homemade-game to the next level). How freakin’ simple is that!? The other thing that makes this a super efficient snack, is that you only need a small amount of chia seeds, so the bag that I buy lasts me for months even if I make this a few times a week.
Ready for the easiest recipe of your life? To make the base you need to mix:
- 3 tbs chia seeds
- 1 cup liquid
Then add anything else you want like strawberries, vanilla extract, honey, blueberries, grated ginger, walnuts, almonds, peaches, cinnamon, you get the idea. The taste is very neutral so alone it’s sort of meh. You’ll want to dress it up a bit, but you can add pretty much anything because the base is so neutral.

The chia seeds will soak up the liquid and form a gel like texture. This can happen in as little as 10 minutes, but I like to make a few jars on a Sunday evening, leave them in the fridge overnight, then I have lunch to take to work the next day. You can even make just the base ahead of time, then add fruit to it when you’re ready to eat, that’s what I do to avoid any nuts or fruit getting soggy.
Easy? *check*
Cost effective? *check*
How about healthy? *checkcheckcheckcheck*
Health Benefits of Chia Seeds
The health benefits of chia seeds are astounding, it’s crazy that more people don’t know of them or eat them on a regular basis. Here are just a few…
- They pack a major nutritional punch. Just two tablespoons has fiber (11g), protein (4 g), omega-3s, calcium, manganese, magnesium, phosphorus, zinc, potassium, Vitamin B1, B2, and B3. Which makes it one of the world’s best sources of several important nutrients, calorie for calorie.
- They are loaded with antioxidants.
- Even though a serving has 12 grams of carbs, 11 of those are fiber, so the carbs your body will digest are only 1 gram, making it good for your blood sugar, and one of the best sources of fiber you can get.
- Just a small amount is great at keeping you full, which can help reduce unnecessary snacking and overeating.
- It’s a high source of protein among plants.
So go-ahead and make a few jars of chia pudding for the week ahead!
Let me know in the comments what you like to put in your chia pudding!

by Caroline | Aug 3, 2018 | Recipes, Wellness
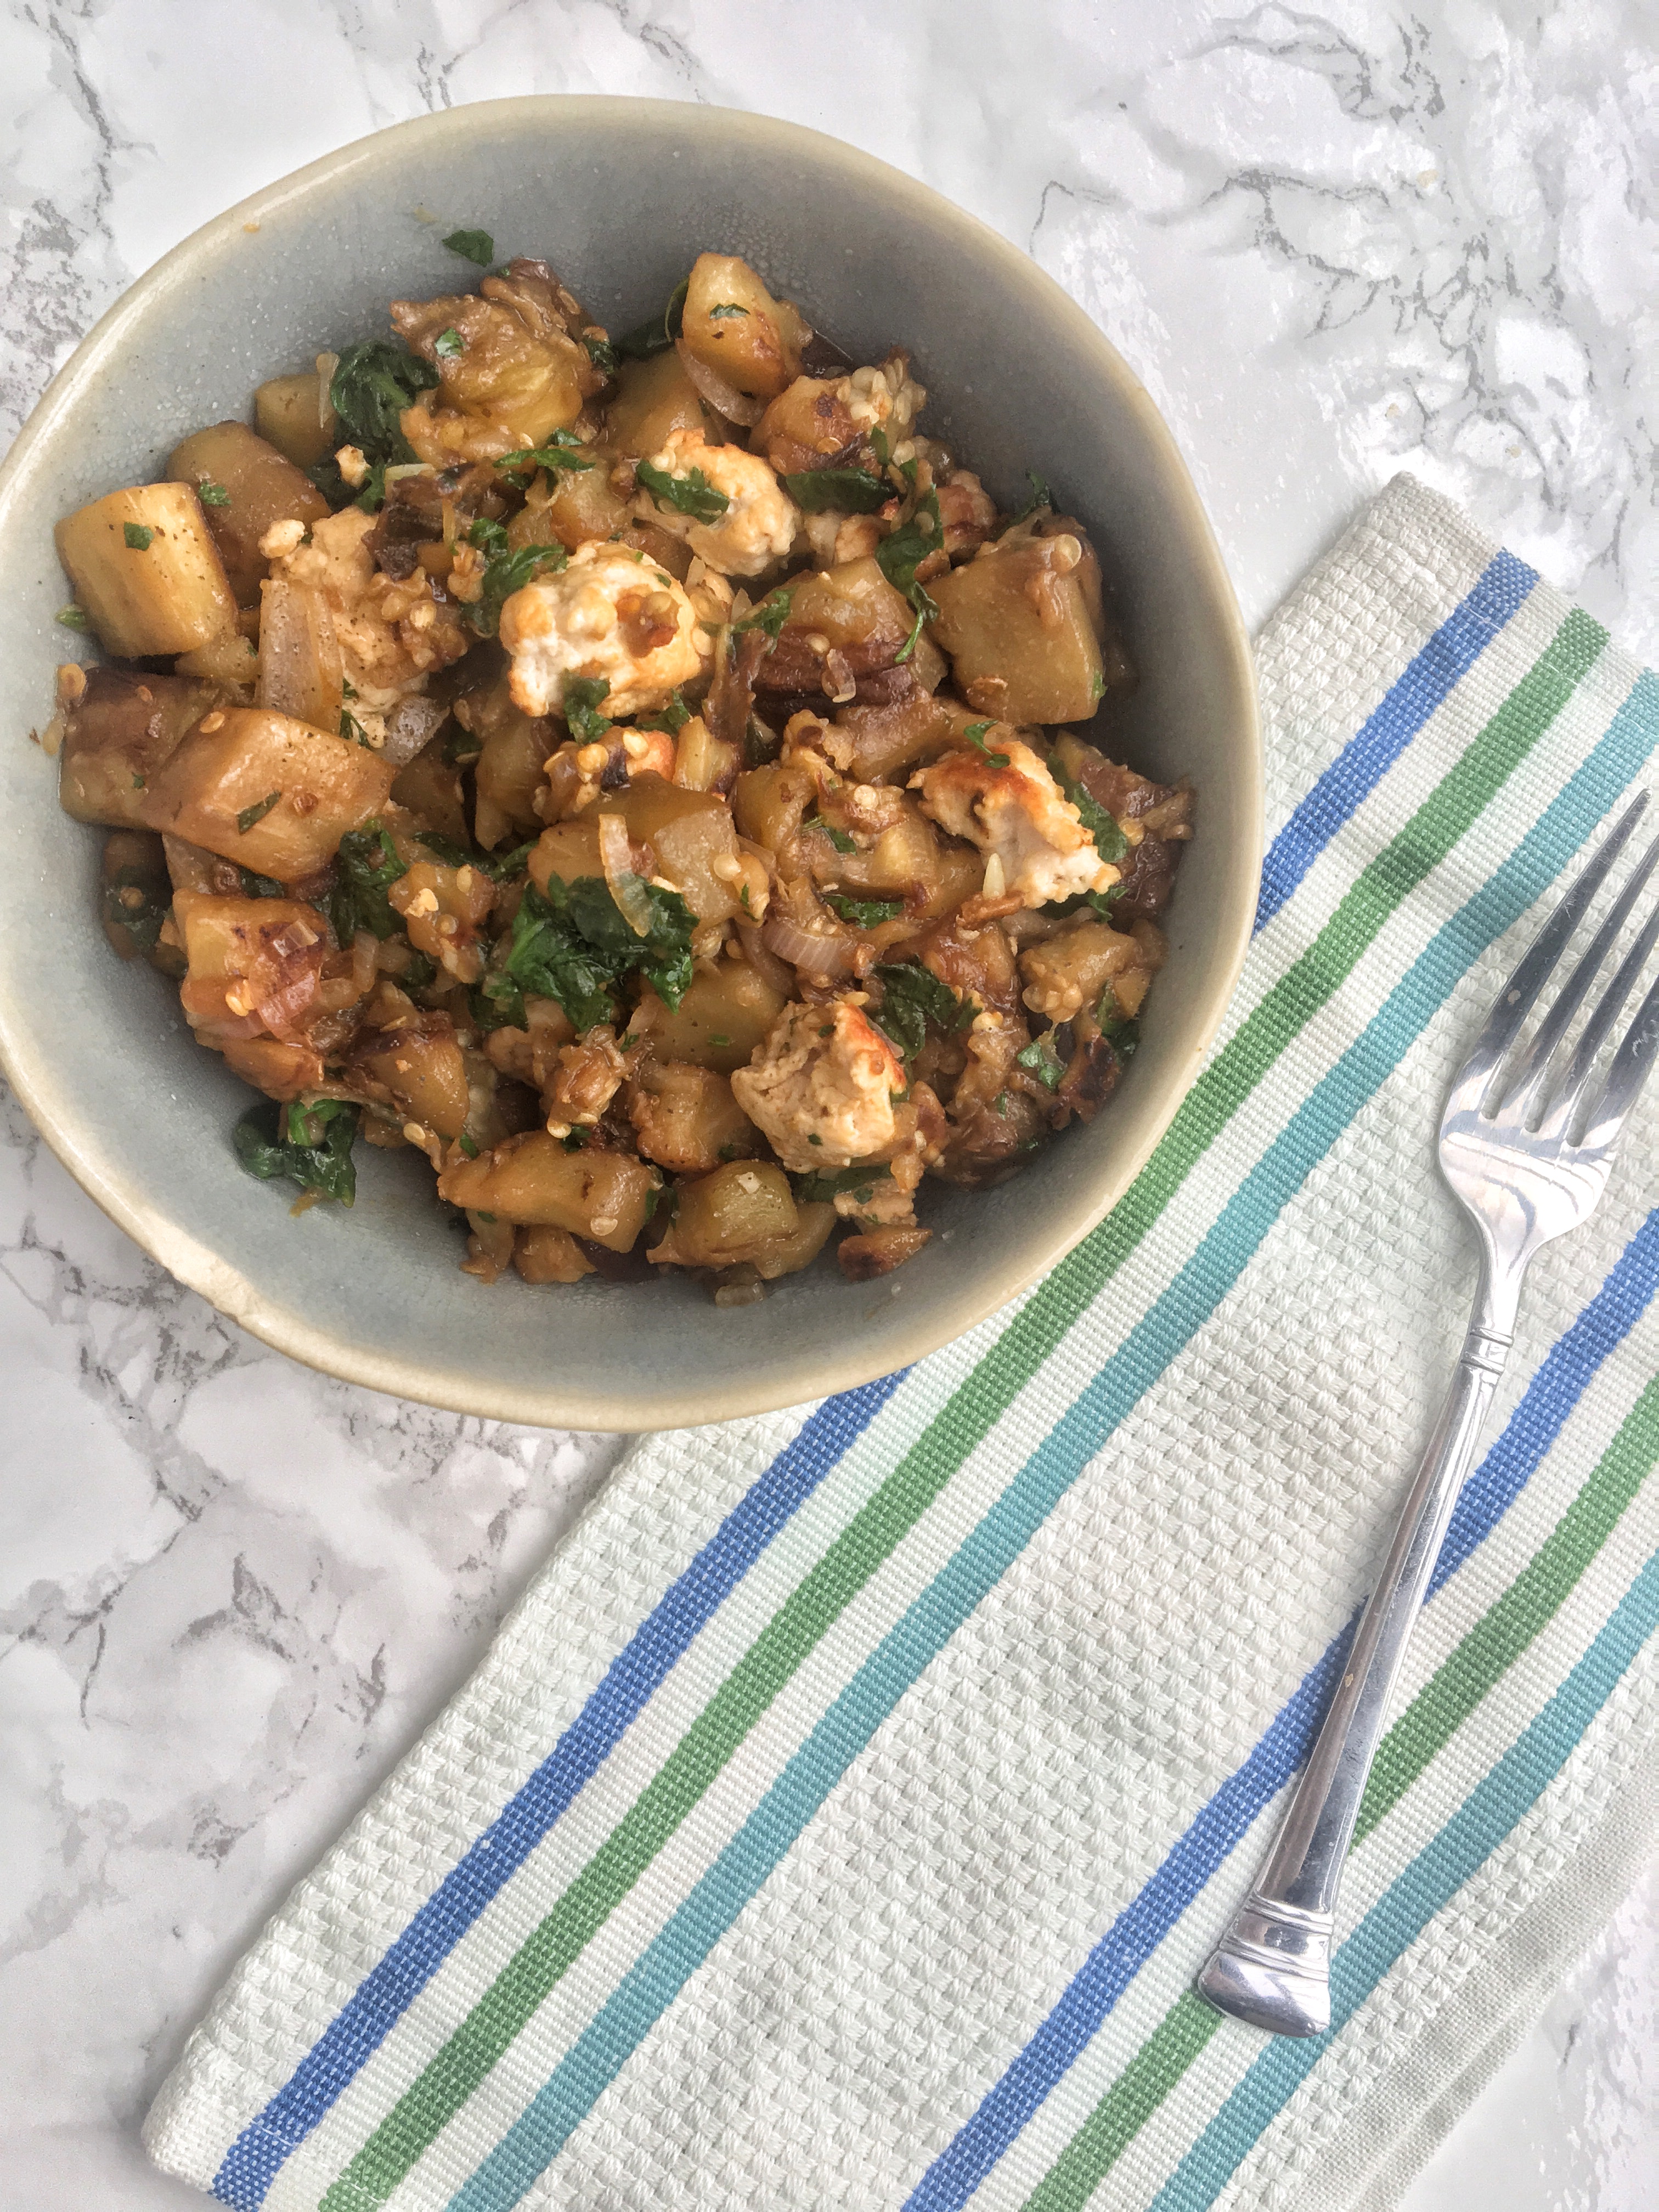
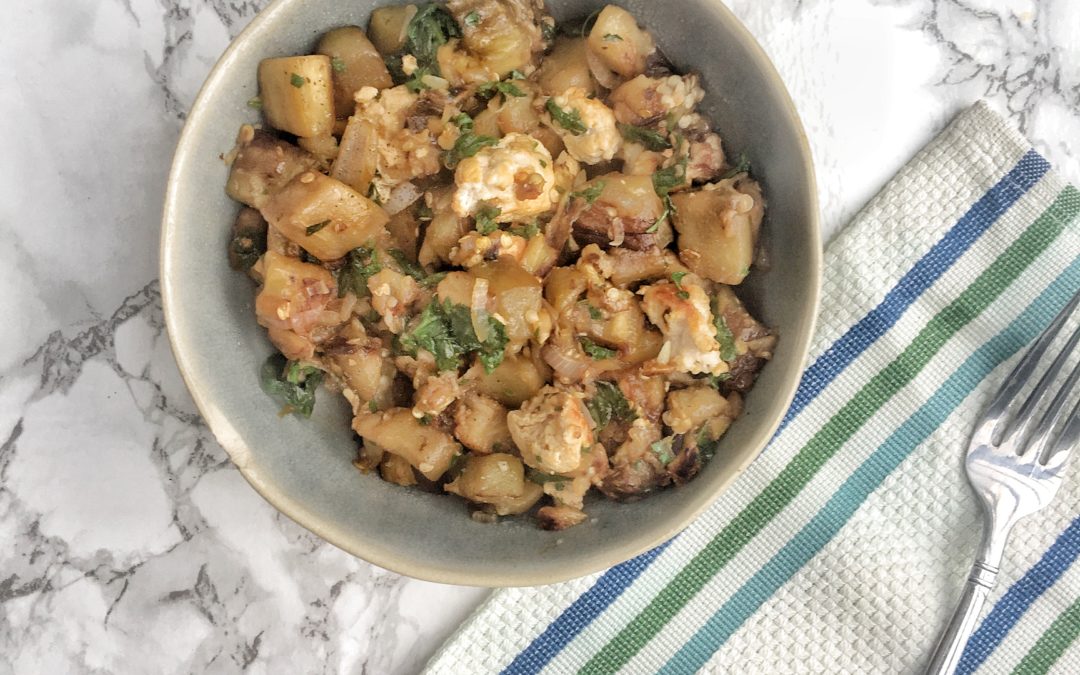
This ginger eggplant and turkey stir fry dish came out of a time when I was trying to follow a recipe, but ended up with half of the actual ingredients, and needed to use some things in my fridge before they went bad (I really hate food waste), and it ended up BETTER than the original recipe. I won’t pretend that I can come up with a stellar recipe our of thin air, but if given a framework I can get pretty creative, the resulting meal almost always turns out a winner. …also anything with ginger is a winner for me.
If you’re like me and avoid lengthy recipes from those gorgeous cookbooks that we all drool over but never actually use, then you’re in good company. I don’t think I’ve ever followed a recipe exactly. It’s impossible if you are conscious of not buying ingredients that will eventually collect dust in your cupboard. In reality it’s much more practical to use what you have, and get some essential ingredients. Which is why I love sharing recipes that are really flexible and allow you to use what you have, and change it up to suit what pleases your taste buds.
So use this (and all other recipes) I share as a framework. Look at what you have already, what you love and or hate to eat, and create a recipe of your own. IF you are still in the mood for turkey check out my Turkey Chili recipe, its especially lovely on a cold day.
PS, a note on herbs. I always hated when recipes called for a small amount of herbs, because you have to buy the whole bunch, and the rest would end up going bad before I could use it. I started using this herb saver we got for our wedding, and not only does it really help them last longer, but it looks so cute on our counter!
Ginger Eggplant Turkey Stir-fry
Serves 2
Ingredients
- 1 eggplant peeled and chopped into 1/2 inch (ish) cubes
- 1/2 lb ground turkey (go for more if you prefer more or are serving 3-4 people)
- a couple of garlic cloves diced (2-3 is fine)
- 1 inch piece of ginger, peeled and minced
- 1 scallion (not necessary if you don’t have one, but it’s yummy)
- handful of chopped cilantro
- handful of spinach leaves (not necessary, I just wanted to use the last of the spinach we had, you can really throw and leftover veggies in this)
- 1-2 tbsp soy sauce
- juice from half a lime
- cooking oil of your choice (I used peanut, but it’s really not important what kind you use)
Ok don’t freak out. I know that looks like a lot, but if you don’t have one or two ingredients, just make do with what you have. I will say that the ginger made this meal so special and unique, so I would make an effort to get that if you don’t have it.
Directions:
- In a large skillet heat up 2-3 tbsp of cooking oil on high and sauté chopped eggplant, stirring until brown. It will look like a lot of eggplant but it shrinks down quite a bit.
- While that is sautéing chop garlic, ginger, scallion, and cilantro. You will need these for later.
- Once the eggplant is browned turn the heat down to low-medium.
- In a separate skillet sauté the turkey meat with the garlic and ginger in your oil of choice. Just a tablespoon or two will be fine.
- Once the turkey meat is cooked through and no longer pink, add it to the eggplant skillet. Finally add the cilantro, spinach, scallion, soy sauce, and lime juice. Sauté together for a minute or two just to incorporate all of the ingredients. Feel free to add other spices or veggies at any point if they speak to you. Like if you are in a curry mood, go for it!
Like I said before, the best recipe is the one you are willing to make. Don’t let complex recipes or lengthy ingredients lists deter you from making a delicious meal! Get creative, be flexible, use what you have, and make it your own!
Bon Apetit!